
1. Introduction
A Private Service Connect interface is a resource that lets a producer Virtual Private Cloud (VPC) network initiate connections to various destinations in a consumer VPC network. Producer and consumer networks can be in different projects and organizations.
If a network attachment accepts a connection from a Private Service Connect interface, Google Cloud allocates the interface an IP address from a consumer subnet that's specified by the network attachment. The consumer and producer networks are connected and can communicate by using internal IP addresses.
A connection between a network attachment and a Private Service Connect interface is similar to the connection between a Private Service Connect endpoint and a service attachment, but it has two key differences:
- A network attachment lets a producer network initiate connections to a consumer network (managed service egress), while an endpoint lets a consumer network initiate connections to a producer network (managed service ingress).
- A Private Service Connect interface connection is transitive. This means that a producer network can communicate with other networks that are connected to the consumer network.
Vertex AI PSC-Interface reachability considerations
- PSC-Interface is capable of routing traffic to VPC or on-premesis based destinations within the RFC1918 address block.
- PSC-Interface targeting non rfc-1918 address blocks requires an explicit proxy deployed in the consumer's VPC with a rfc-1918 address. Within the Vertex AI deployment, the proxy must be defined along with a FQDN of the target endpoint.
- When you configure your deployment with only a PSC Interface, it retains its default internet access. This outbound traffic egresses directly from the secure, Google-managed tenant network.
Vertex AI PSC-Interface VPC-SC considerations
- When your project is part of a VPC Service Controls perimeter, the Google-managed tenants default internet access is blocked by the perimeter to prevent data exfiltration.
- To allow the deployment access to the public internet in this scenario, you must explicitly configure a secure egress path that routes traffic through your VPC.
- The recommended way to achieve this is by setting up a proxy server inside your VPC perimeter with a RFC1918 address and creating a Cloud NAT gateway to allow the proxy VM to access the internet.
For additional information, refer to the following resources:
Deploy an agent | Generative AI on Vertex AI | Google Cloud
Set up a Private Service Connect interface for Vertex AI resources | Google Cloud
What you'll build
In this tutorial, you're going to build a comprehensive Agent Engine deployed with Private Service Connect (PSC) Interface to allow connectivity to a public site (https://api.frankfurter.app/) through a Proxy VM deployed in the consumer's VPC with a RFC1918 address. The example deployment is applicable in a VPC-SC enabled project or for administrators that require internet egress through the customers network instead of the tenant vpc.
Figure 1

You'll create a single psc-network-attachment in the consumer VPC leveraging DNS peering to resolve the consumer network proxy-vm in the tenant project hosting Agent Engine resulting in the following use cases:
Deploy Agent Engine and configuring a proxy VM to act as an explicit proxy, allowing it to reach a public URL https://api.frankfurter.app
What you'll learn
- How to create a network attachment
- How a producer can use a network attachment to create a PSC interface
- How to establish communication from the producer to the consumer using DNS Peering
- How to deploy and use a proxy vm for internet egress
What you'll need
Google Cloud Project
IAM Permissions
- Compute Network Admin (roles/compute.networkAdmin)
- Compute Instance Admin (roles/compute.instanceAdmin)
- Compute Security Admin (roles/compute.securityAdmin)
- DNS Administrator (roles/dns.admin)
- IAP-secured Tunnel User (roles/iap.tunnelResourceAccessor)
- Logging Admin (roles/logging.admin)
- Notebooks Admin (roles/notebooks.admin)
- Project IAM Admin (roles/resourcemanager.projectIamAdmin)
- Service Account Admin (roles/iam.serviceAccountAdmin)
- Service Usage Admin (roles/serviceusage.serviceUsageAdmin)
2. Before you begin
Update the project to support the tutorial
This tutorial makes use of $variables to aid gcloud configuration implementation in Cloud Shell.
Inside Cloud Shell, perform the following:
gcloud config list project
gcloud config set project [YOUR-PROJECT-NAME]
projectid=YOUR-PROJECT-NAME
echo $projectid
API Enablement
Inside Cloud Shell, perform the following:
gcloud services enable "compute.googleapis.com"
gcloud services enable "aiplatform.googleapis.com"
gcloud services enable "dns.googleapis.com"
gcloud services enable "notebooks.googleapis.com"
gcloud services enable "storage.googleapis.com"
gcloud services enable "iap.googleapis.com"
Verify that the APIs are enabled successfully
gcloud services list --enabled
3. Consumer Setup
Create the Consumer VPC
This VPC resides in a customer project. Following resources will be created in this VPC
- Consumer Subnet
- Network Attachment Subnet
- Cloud Router (Required for Cloud NAT)
- Cloud NAT
Inside Cloud Shell, perform the following:
gcloud compute networks create consumer-vpc --project=$projectid --subnet-mode=custom
Create the consumer subnets
Inside Cloud Shell, create the subnet for the Proxy VM:
gcloud compute networks subnets create rfc1918-subnet1 --project=$projectid --range=10.10.10.0/28 --network=consumer-vpc --region=us-central1
Create the Private Service Connect Network Attachment subnet
Inside Cloud Shell, create the subnet for the PSC Network Attachment:
gcloud compute networks subnets create intf-subnet --project=$projectid --range=192.168.10.0/28 --network=consumer-vpc --region=us-central1
Cloud Router and NAT configuration
In this tutorial, Cloud NAT is used to provide internet access for the proxy VM, which doesn't have a public IP address. Cloud NAT makes it possible for VMs with only private IP addresses to connect to the internet, allowing them to perform tasks like installing software packages.
Inside Cloud Shell, create the Cloud Router.
gcloud compute routers create cloud-router-for-nat --network consumer-vpc --region us-central1
Inside Cloud Shell, create the NAT gateway with logging enabled. We will use logging to validate access to the public ip for Frankfurter API (https://api.frankfurter.app/).
gcloud compute routers nats create cloud-nat-us-central1 --router=cloud-router-for-nat --auto-allocate-nat-external-ips --nat-all-subnet-ip-ranges --region us-central1 --enable-logging --log-filter=ALL
4. Enable IAP
To allow IAP to connect to your VM instances, create a firewall rule that:
- Applies to all VM instances that you want to be accessible by using IAP.
- Allows ingress traffic from the IP range 35.235.240.0/20. This range contains all IP addresses that IAP uses for TCP forwarding.
Inside Cloud Shell, create the IAP firewall rule.
gcloud compute firewall-rules create ssh-iap-consumer \
    --network consumer-vpc \
    --allow tcp:22 \
    --source-ranges=35.235.240.0/20
5. Create consumer VM instances
Within Cloud Shell, create the consumer VM instance, proxy-vm, which will serve as the explicit proxy for Agent Engine. We will utilize tinyproxy as the application for proxying HTTP traffic.
gcloud compute instances create proxy-vm \
    --project=$projectid \
    --machine-type=e2-micro \
    --image-family debian-11 \
    --no-address \
    --can-ip-forward \
    --image-project debian-cloud \
    --zone us-central1-a \
    --subnet=rfc1918-subnet1 \
    --shielded-secure-boot \
    --metadata startup-script="#! /bin/bash
      sudo apt-get update
      sudo apt-get install tcpdump
      sudo apt-get install tinyproxy -y
      sudo apt-get install apache2 -y
      sudo service apache2 restart
      echo 'proxy server !!' | tee /var/www/html/index.html
      EOF"
6. Private Service Connect network attachment
Network attachments are regional resources that represent the consumer side of a Private Service Connect interface. You associate a single subnet with a network attachment, and the producer assigns IPs to the Private Service Connect interface from that subnet. The subnet must be in the same region as the network attachment. A network attachment must be in the same region as the producer service.
Create the network attachment
Inside Cloud Shell, create the network attachment.
gcloud compute network-attachments create psc-network-attachment \
    --region=us-central1 \
    --connection-preference=ACCEPT_AUTOMATIC \
    --subnets=intf-subnet
List the network attachments
Inside Cloud Shell, list the network attachment.
gcloud compute network-attachments list
Describe the network attachments
Inside Cloud Shell, describe the network attachment.
gcloud compute network-attachments describe psc-network-attachment --region=us-central1
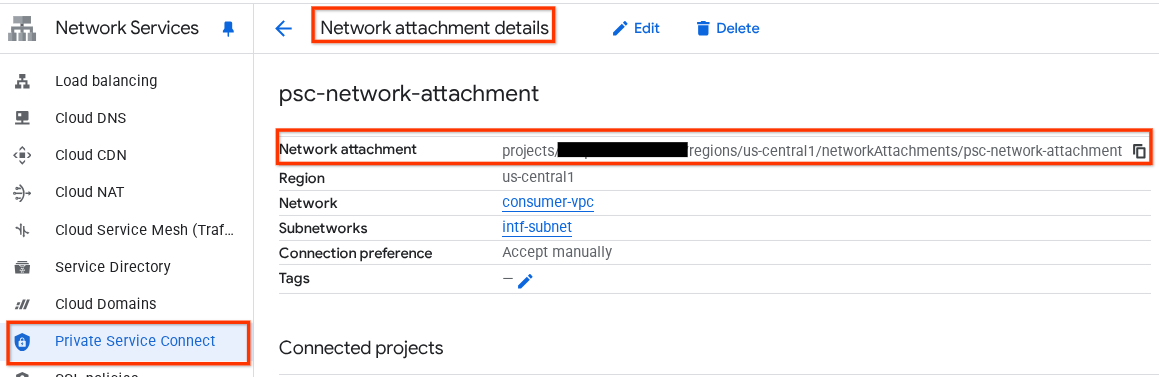
Make note of the PSC Network Attachmentname, psc-network-attachment, that will be used by the producer when creating the Private Service Connect Interface.
To view the PSC Network Attachment URL in Cloud Console, navigate to the following:
Network Services → Private Service Connect → Network Attachment → psc-network-attachment
7. Private DNS Zone
You'll create a Cloud DNS Zone for demo.com and populate it with an A record that points to your proxy-vm's IP addresses. Later, DNS peering will be deployed in Agent Engine, which will allow access to the consumer's DNS records.
Inside Cloud Shell, perform the following that creates a DNS name demo.com.
gcloud dns --project=$projectid managed-zones create private-dns-codelab --description="" --dns-name="demo.com." --visibility="private" --networks="https://compute.googleapis.com/compute/v1/projects/$projectid/global/networks/consumer-vpc"
Obtain and store the IP Addresses of the instances used for DNS A records.
Inside Cloud Shell, perform a describe against the VM instances.
gcloud compute instances describe proxy-vm --zone=us-central1-a | grep networkIP:
Inside Cloud Shell, create the records set for the VM, proxy-vm.demo.com, ensure to update the IP Address based on your environment's output.
gcloud dns --project=$projectid record-sets create proxy-vm.demo.com. --zone="private-dns-codelab" --type="A" --ttl="300" --rrdatas="10.10.10.2"
Create a Cloud Firewall rule to allow access from the PSC Interface
In the following section, create a firewall rule that allows traffic originating from the PSC Network Attachment access to the proxy-vm in Consumer VPC.
In Cloud Shell, create the ingress firewall rule.
gcloud compute firewall-rules create allow-access-to-compute \
    --network=consumer-vpc \
    --action=ALLOW \
    --rules=ALL \
    --direction=INGRESS \
    --priority=1000 \
    --source-ranges="192.168.10.0/28" \
    --destination-ranges="10.10.10.0/28" \
    --enable-logging
8. Create a Jupyter Notebook
The following section guides you through creating a Jupyter Notebook. This notebook will be used to deploy Agent Engine targeting an explicit proxy for Internet Egress.
Create a user managed service account
In the following section, you will create a service account that will be associated with the Vertex AI Workbench instance used in the tutorial.
In the tutorial, the service account will have the following roles applied:
Inside Cloud Shell, create the service account.
gcloud iam service-accounts create notebook-sa \
    --display-name="notebook-sa"
Inside Cloud Shell, update the service account with the role Storage Admin.
gcloud projects add-iam-policy-binding $projectid --member="serviceAccount:notebook-sa@$projectid.iam.gserviceaccount.com" --role="roles/storage.admin"
Inside Cloud Shell, update the service account with the role Vertex AI User.
gcloud projects add-iam-policy-binding $projectid --member="serviceAccount:notebook-sa@$projectid.iam.gserviceaccount.com" --role="roles/aiplatform.user"
Inside Cloud Shell, update the service account with the role Artifact Registry Admin.
gcloud projects add-iam-policy-binding $projectid --member="serviceAccount:notebook-sa@$projectid.iam.gserviceaccount.com" --role="roles/artifactregistry.admin"
Inside Cloud Shell, allow the notebook service account to use the Compute Engine default service account.
gcloud iam service-accounts add-iam-policy-binding \
    $(gcloud projects describe $(gcloud config get-value project) --format='value(projectNumber)')-compute@developer.gserviceaccount.com \
    --member="serviceAccount:notebook-sa@$projectid.iam.gserviceaccount.com" \
    --role="roles/iam.serviceAccountUser"
9. Update the explicit proxy
In the following section, you will need to ssh into the explicit proxy and update tinyproxy.conf configuration file followed by performing a reset.
From Cloud Shell
gcloud compute ssh --zone us-central1-a "proxy-vm" --tunnel-through-iap --project $projectid
Open the tinyproxy config file, update using an editor or your choice. Below is an example using VIM.
sudo vim /etc/tinyproxy/tinyproxy.conf

# Locate the "Listen" configuration line to restrict listening to only its private IP address of the Proxy-VM, rather than all interfaces.

Listen 10.10.10.2

# Locate the "Allow" configuration line to allow requests ONLY from the PSC Network Attachment Subnet

Allow 192.168.10.0/24

Save the configs by the following steps:
1. Press the `ESC` key to enter Command Mode.
2. Type `:wq` to save (w) and quit (q).
3. Press `Enter`

Restart the tinyproxy service to apply