
1. Before you begin
In this codelab, you'll learn how to create a camera app that uses CameraX to show a viewfinder, take photos, capture video, and analyze an image stream from the camera.
To achieve this, we will introduce the concept of use cases in CameraX, which you can use for a variety of camera operations, from displaying a viewfinder to capturing videos.
Prerequisites
- Basic Android development experience.
- MediaStore knowledge is desirable but not required.
What you'll do
- Learn how to add the CameraX dependencies.
- Learn how to display the camera preview in an activity. (Preview use case)
- Build an app that can take a photo and save it to storage. (ImageCapture use case)
- Learn how to analyze frames from the camera in real time. (ImageAnalysis use case)
- Learn how to capture video to MediaStore. (VideoCapture use case)
What you'll need
- An Android device or Android Studio's emulator:
- Recommend Android 10 and above: MediaStore behavior depends on scoped storage availability.
- With Android Emulator**, we recommend using an Android Virtual Device (AVD) that is based on Android 11 or higher**.
- Note that CameraX only requires a minimum supported API level to be 21.
- Android Studio Arctic Fox 2020.3.1 or above.
- Understand of Kotlin and Android ViewBinding
2. Create the project
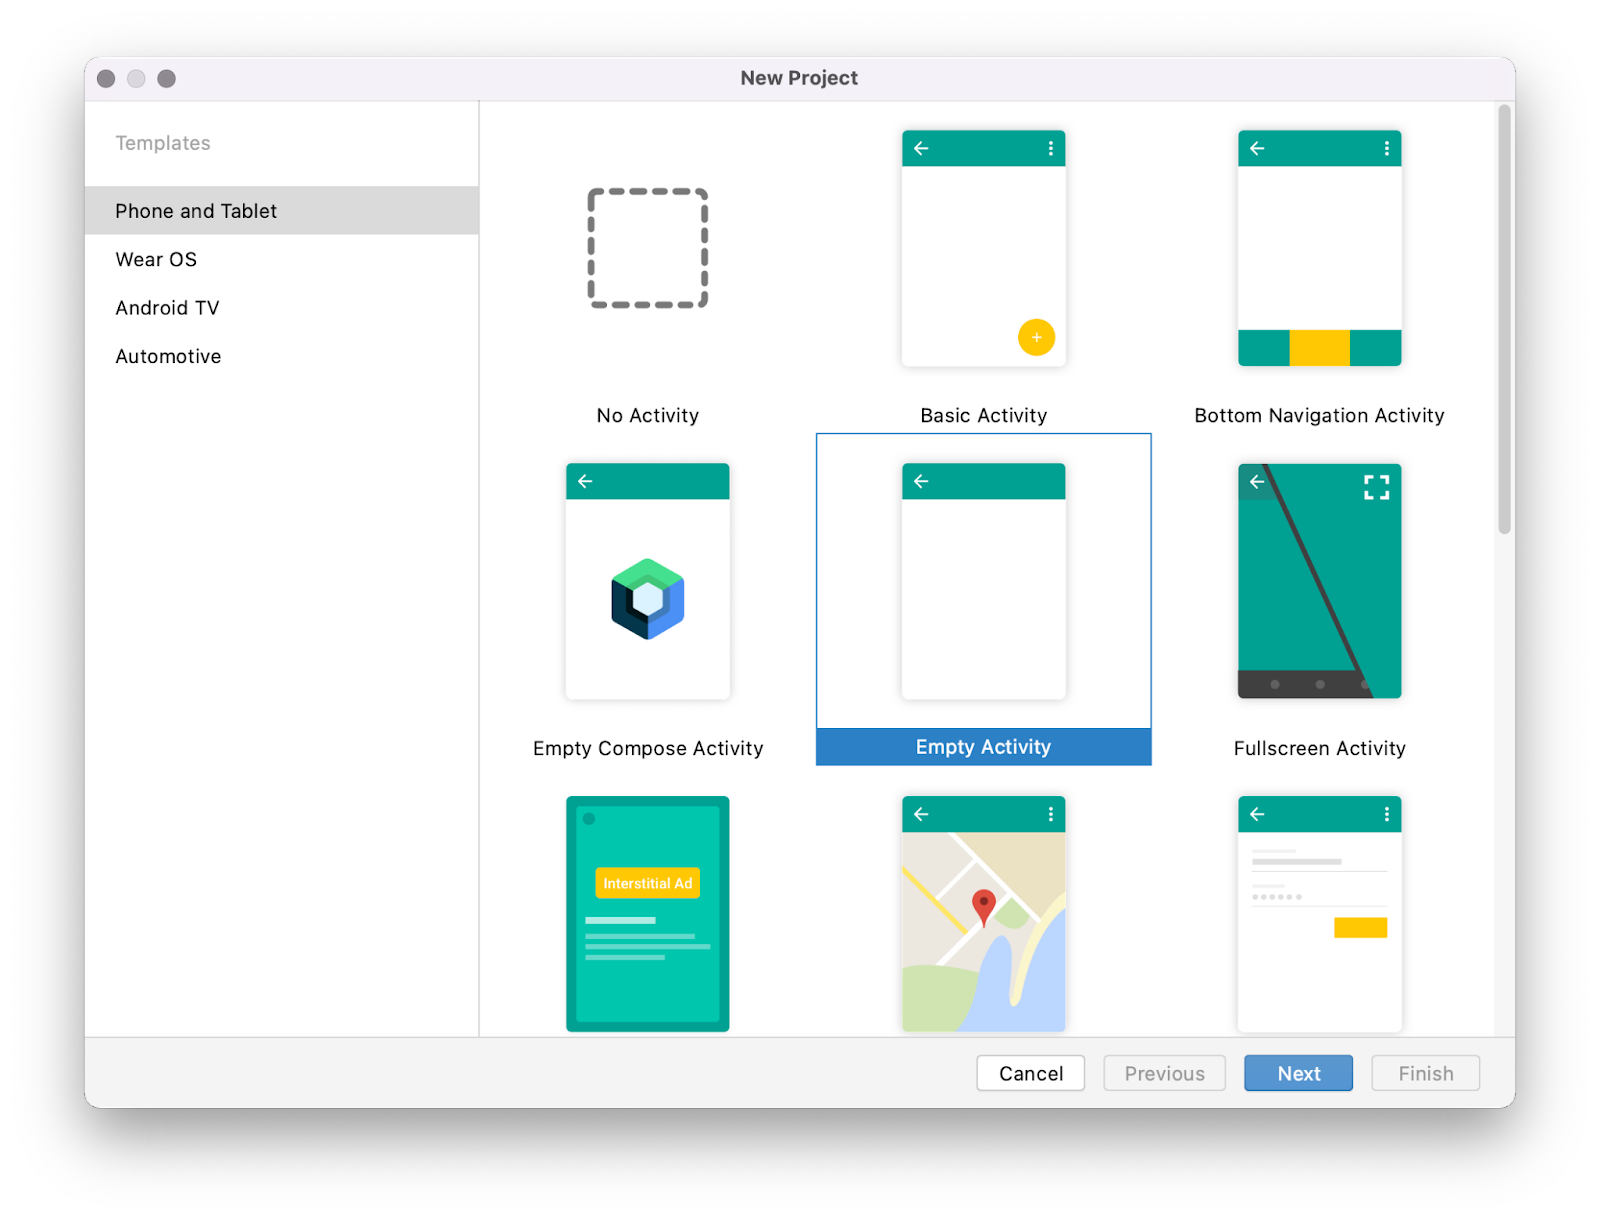
- In Android Studio, create a new project, and select Empty Views Activity when prompted.
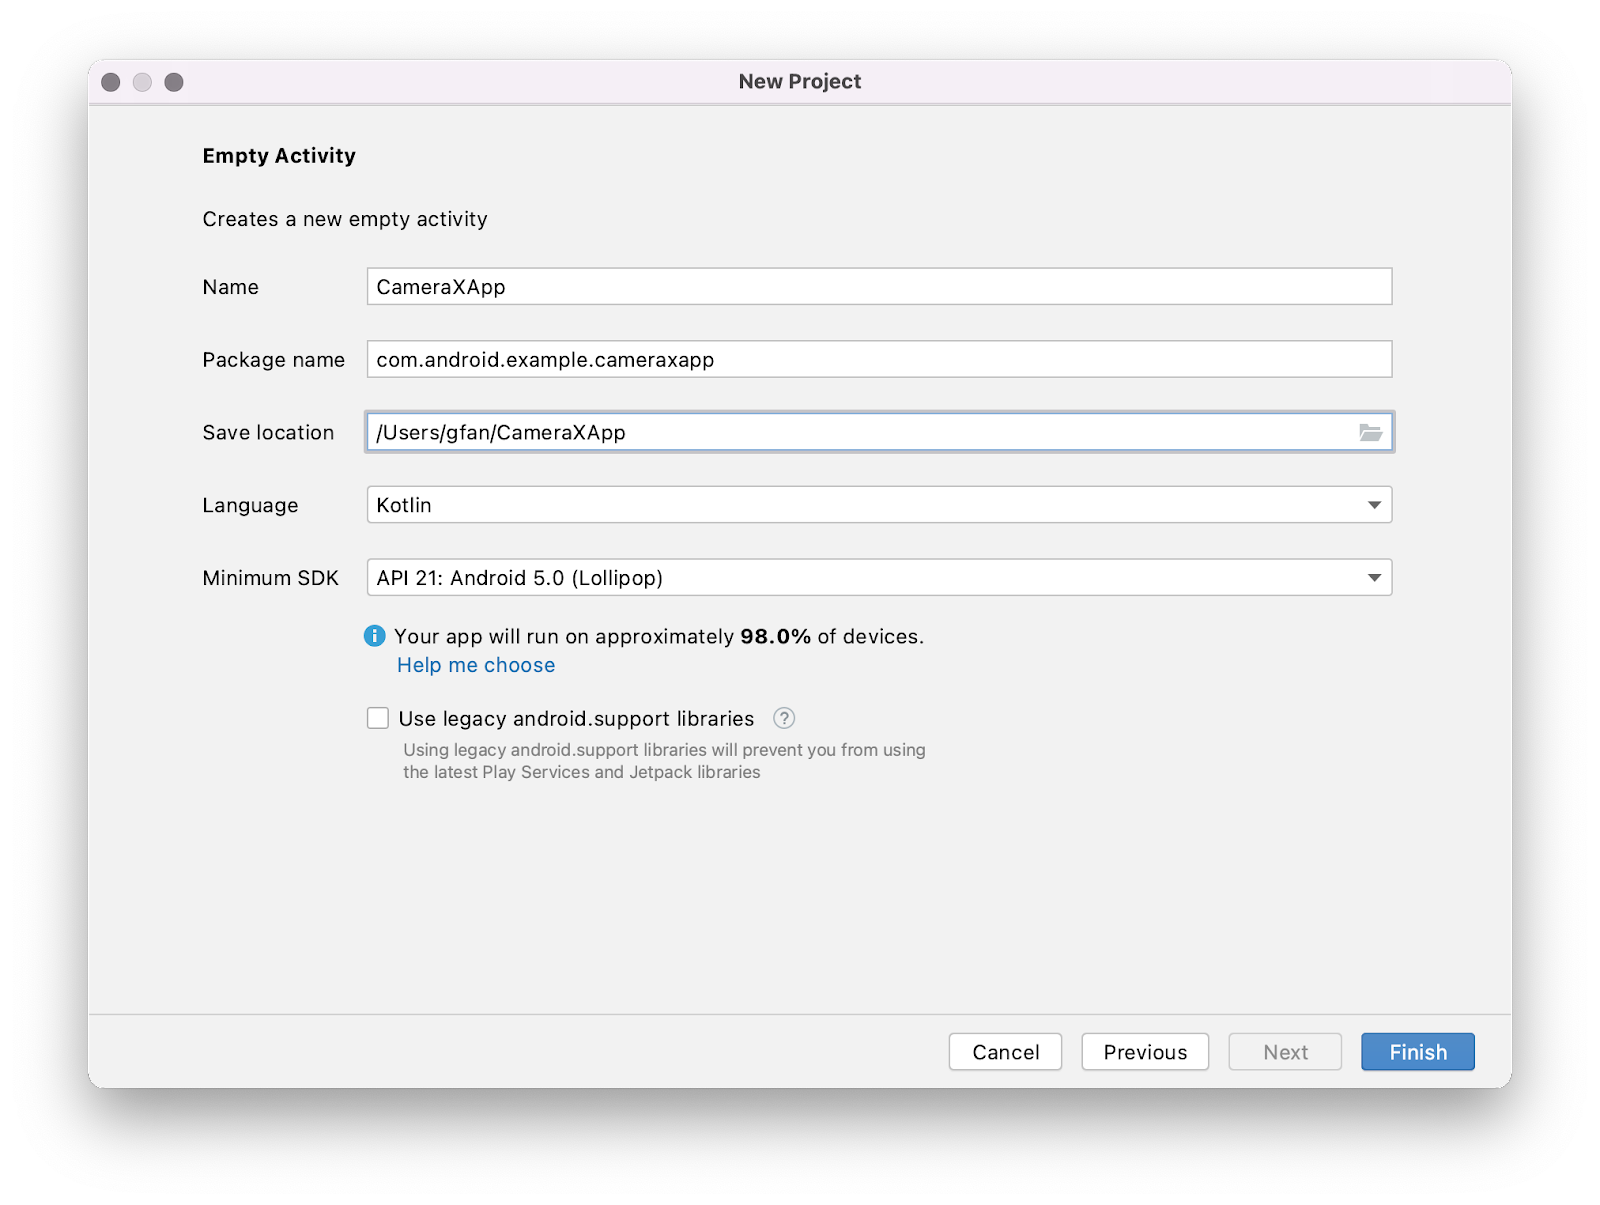
- Next, name the app "CameraXApp", and confirm or change the package name to be "
com.android.example.cameraxapp". Choose Kotlin for the language, and set the minimum API level to 21 (which is the minimum required for CameraX). For older versions of Android Studio, be sure to include AndroidX artifacts support.
Add the Gradle dependencies
- Open the
build.gradlefile for theCameraXApp.appmodule, and add the CameraX dependencies:
dependencies {
  def camerax_version = "1.2.2"
  implementation "androidx.camera:camera-core:${camerax_version}"
  implementation "androidx.camera:camera-camera2:${camerax_version}"
  implementation "androidx.camera:camera-lifecycle:${camerax_version}"
  implementation "androidx.camera:camera-video:${camerax_version}"

  implementation "androidx.camera:camera-view:${camerax_version}"
  implementation "androidx.camera:camera-extensions:${camerax_version}"
}
- CameraX needs some methods that are part of Java 8, so we need to set our compile options accordingly. Ensure that the
androidblock has the following:
compileOptions {
    sourceCompatibility JavaVersion.VERSION_1_8
    targetCompatibility JavaVersion.VERSION_1_8
}
- This codelab uses ViewBinding, so enable it with the following (at the end of the
android{}block):
buildFeatures {
   viewBinding true
}
When prompted, click Sync Now, and we will be ready to use CameraX in our app.
Create the codelab layout
In the UI for this codelab, we use the following:
- A CameraX PreviewView (to preview camera image/video).
- A standard button to control image capture.
- A standard button to start/stop video capture.
- A vertical guideline to position the 2 buttons.
Let's replace the default layout with this code to:
- Open the
activity_mainlayout file atres/layout/activity_main.xml, and replace it with the following code.
<?xml version="1.0" encoding="utf-8"?>
<androidx.constraintlayout.widget.ConstraintLayout
   xmlns:android="http://schemas.android.com/apk/res/android"
   xmlns:app="http://schemas.android.com/apk/res-auto"
   xmlns:tools="http://schemas.android.com/tools"
   android:layout_width="match_parent"
   android:layout_height="match_parent"
   tools:context=".MainActivity">

   <androidx.camera.view.PreviewView
       android:id="@+id/viewFinder"
       android:layout_width="match_parent"
       android:layout_height="match_parent" />

   <Button
       android:id="@+id/image_capture_button"
       android:layout_width="110dp"
       android:layout_height="110dp"
       android:layout_marginBottom="50dp"
       android:layout_marginEnd="50dp"
       android:elevation="2dp"
       android:text="@string/take_photo"
       app:layout_constraintBottom_toBottomOf="parent"
       app:layout_constraintLeft_toLeftOf="parent"
       app:layout_constraintEnd_toStartOf="@id/vertical_centerline" />

   <Button
       android:id="@+id/video_capture_button"
       android:layout_width="110dp"
       android:layout_height="110dp"
       android:layout_marginBottom="50dp"
       android:layout_marginStart="50dp"
       android:elevation="2dp"
       android:text="@string/start_capture"
       app:layout_constraintBottom_toBottomOf="parent"
       app:layout_constraintStart_toEndOf="@id/vertical_centerline" />

   <androidx.constraintlayout.widget.Guideline
       android:id="@+id/vertical_centerline"
       android:layout_width="wrap_content"
       android:layout_height="wrap_content"
       android:orientation="vertical"
       app:layout_constraintGuide_percent=".50" />

</androidx.constraintlayout.widget.ConstraintLayout>
- update
res/values/strings.xmlfile with the following
<resources>
   <string name="app_name">CameraXApp</string>
   <string name="take_photo">Take Photo</string>
   <string name="start_capture">Start Capture</string>
   <string name="stop_capture">Stop Capture</string>
</resources>
Set up MainActivity.kt
- Replace the code in
MainActivity.kt, with the following code, but leave the package name intact. It includes import statements, variables we will instantiate, functions we will implement, and constants.
onCreate() has already been implemented for us to check for camera permissions, start the camera, set the onClickListener() for the photo and capture buttons, and implement cameraExecutor. Even though the onCreate() is implemented for you, the camera will not work yet until we implement the methods in the file.
package com.android.example.cameraxapp

import android.Manifest
import android.content.ContentValues
import android.content.pm.PackageManager
import android.os.Build
import android.os.Bundle
import android.provider.MediaStore
import androidx.appcompat.app.AppCompatActivity
import androidx.camera.core.ImageCapture
import androidx.camera.video.Recorder
import androidx.camera.video.Recording
import androidx.camera.video.VideoCapture
import androidx.core.app.ActivityCompat
import androidx.core.content.ContextCompat
import com.android.example.cameraxapp.databinding.ActivityMainBinding
import java.util.concurrent.ExecutorService
import java.util.concurrent.Executors
import android.widget.Toast
import androidx.activity.result.contract.ActivityResultContracts
import androidx.camera.lifecycle.ProcessCameraProvider
import androidx.camera.core.Preview
import androidx.camera.core.CameraSelector
import android.util.Log
import androidx.camera.core.ImageAnalysis
import androidx.camera.core.ImageCaptureException
import androidx.camera.core.ImageProxy
import androidx.camera.video.FallbackStrategy
import androidx.camera.video.MediaStoreOutputOptions
import androidx.camera.video.Quality
import androidx.camera.video.QualitySelector
import androidx.camera.video.VideoRecordEvent
import androidx.core.content.PermissionChecker
import java.nio.ByteBuffer
import java.text.SimpleDateFormat
import java.util.Locale

typealias LumaListener = (luma: Double) -> Unit

class MainActivity : AppCompatActivity() {
    private lateinit var viewBinding: ActivityMainBinding

    private var imageCapture: ImageCapture? = null

    private var videoCapture: VideoCapture<Recorder>? = null
    private var recording: Recording? = null

    private lateinit var cameraExecutor: ExecutorService

    override fun onCreate(savedInstanceState: Bundle?) {
        super.onCreate(savedInstanceState)
        viewBinding = ActivityMainBinding.inflate(layoutInflater)
        setContentView(viewBinding.root)

        // Request camera permissions
        if (allPermissionsGranted()) {
            startCamera()
        } else {
            requestPermissions()
        }

        // Set up the listeners for take photo and video capture buttons
        viewBinding.imageCaptureButton.setOnClickListener { takePhoto() }
        viewBinding.videoCaptureButton.setOnClickListener { captureVideo() }

        cameraExecutor = Executors.newSingleThreadExecutor()
    }

    private fun takePhoto() {}

    private fun captureVideo() {}

    private fun startCamera() {}

    private fun requestPermissions() {}

    private fun allPermissionsGranted() = REQUIRED_PERMISSIONS.all {
        ContextCompat.checkSelfPermission(
            baseContext, it) == PackageManager.PERMISSION_GRANTED
    }

    override fun onDestroy() {
        super.onDestroy()
        cameraExecutor.shutdown()
    }

    companion object {
        private const val TAG = "CameraXApp"
        private const val FILENAME_FORMAT = "yyyy-MM-dd-HH-mm-ss-SSS"
        private val REQUIRED_PERMISSIONS =
            mutableListOf (
                Manifest.permission.CAMERA,
                Manifest.permission.RECORD_AUDIO
            ).apply {
                if (Build.VERSION.SDK_INT <= Build.VERSION_CODES.P) {
                    add(Manifest.permission.WRITE_EXTERNAL_STORAGE)
                }
            }.toTypedArray()
    }
}
3. Request the necessary permissions
Before the app opens the camera, it needs permission from the user to do so; microphone permission is also needed to record audio; on Android 9 (P) and before, MediaStore needs the external storage writing permission. In this step, we'll implement those necessary permissions.
- Open
AndroidManifest.xmland add these lines before theapplicationtag.
<uses-feature android:name="android.hardware.camera.any" />
<uses-permission android:name="android.permission.CAMERA" />
<uses-permission android:name="android.permission.RECORD_AUDIO" />
<uses-permission android:name="android.permission.WRITE_EXTERNAL_STORAGE"
   android:maxSdkVersion="28" />
Adding android.hardware.camera.any makes sure that the device has a camera. Specifying .any means that it can be a front camera or a back camera.
- Copy this code into
MainActivity.kt. The bullet points below will break down the code we just copied.
private val activityResultLauncher =
    registerForActivityResult(
        ActivityResultContracts.RequestMultiplePermissions())
    { permissions ->
        // Handle Permission granted/rejected
        var permissionGranted = true
        permissions.entries.forEach {
            if (it.key in REQUIRED_PERMISSIONS && it.value == false)
                permissionGranted = false
        }
        if (!permissionGranted) {
            Toast.makeText(baseContext,
                "Permission request denied",
                Toast.LENGTH_SHORT).show()
        } else {
            startCamera()
        }
    }
- Loop through each
permissions.entriesand if anyREQUIRED_PERMISSIONSare not granted, setpermissionGrantedtofalse. - If permissions are not granted, present a toast to notify the user that the permissions were not granted.
if (!permissionGranted) {
    Toast.makeText(baseContext,
        "Permission request denied",
        Toast.LENGTH_SHORT).show()
}
- If the permissions are granted, call
startCamera().
else {
   startCamera()
}
- Copy this code into the
requestPermissions()method to launchActivityResultLauncheradded in the last step. For more details, see the Request runtime permissions guide.
private fun requestPermissions() {
    activityResultLauncher.launch(REQUIRED_PERMISSIONS)
}
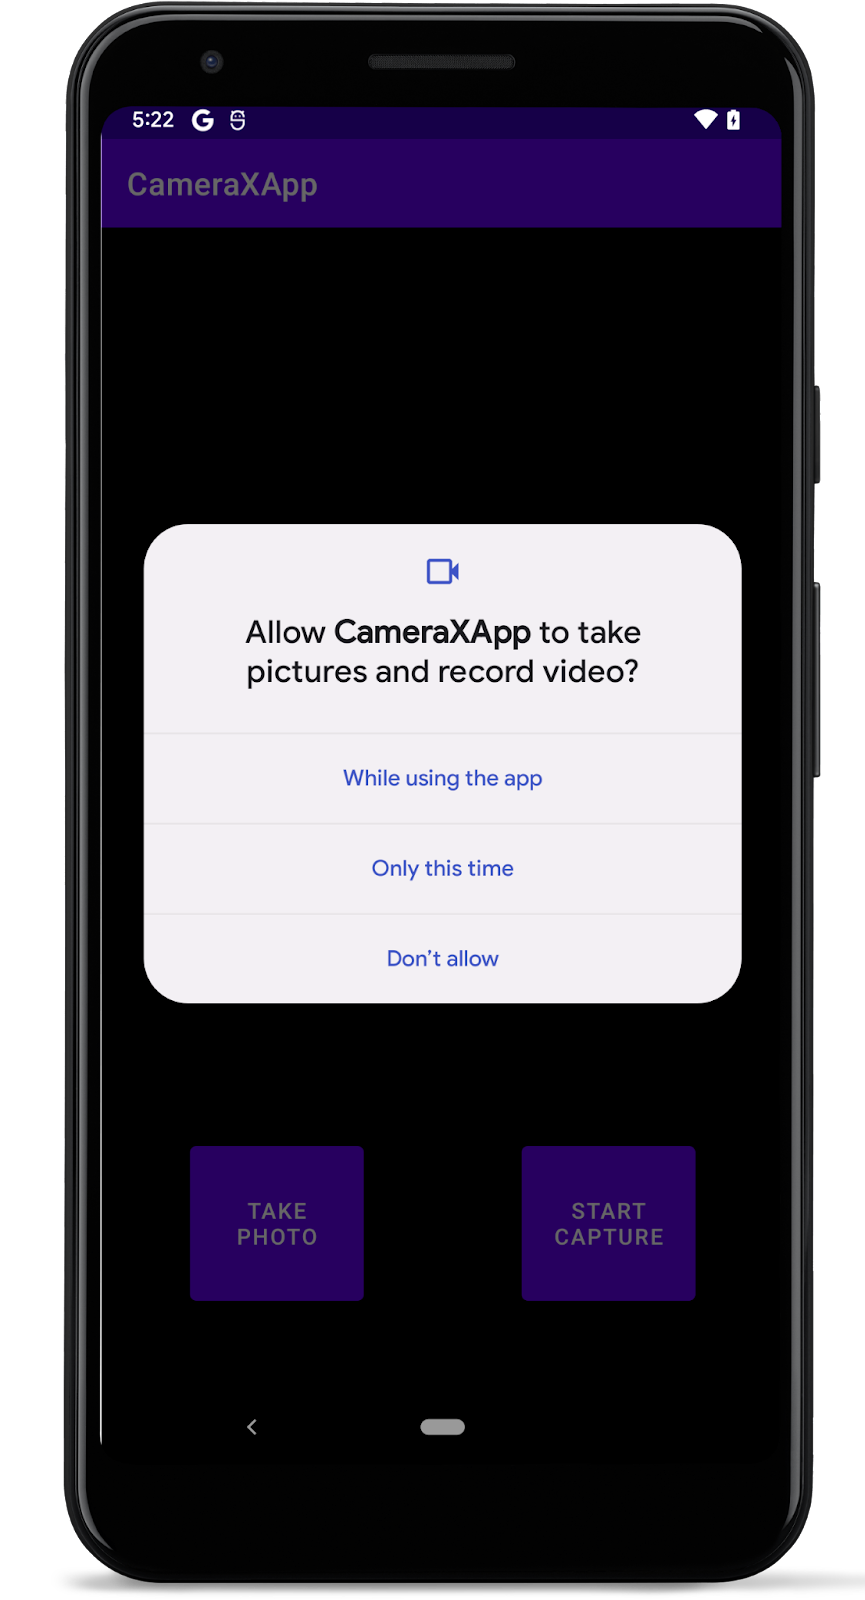
- Run the app.
It should now ask permission to use the camera and microphone:
4. Implement Preview use case
In a camera application, the viewfinder is used to let the user preview the photo they will be taking. We will implement a viewfinder using the CameraX Preview class.
To use Preview, we will first need to define a configuration, which then gets used to create an instance of the use case. The resulting instance is what we bind to the CameraX lifecycle.
- Copy this code into the
startCamera()function.
The bullet points below will break down the code we just copied.
private fun startCamera() {
   val cameraProviderFuture = ProcessCameraProvider.getInstance(this)

   cameraProviderFuture.addListener({
       // Used to bind the lifecycle of cameras to the lifecycle owner
       val cameraProvider: ProcessCameraProvider = cameraProviderFuture.get()

       // Preview
       val preview = Preview.Builder()
          .build()
          .also {
              it.setSurfaceProvider(viewBinding.viewFinder.surfaceProvider)
          }

       // Select back camera as a default
       val cameraSelector = CameraSelector.DEFAULT_BACK_CAMERA

       try {
           // Unbind use cases before rebinding
           cameraProvider.unbindAll()

           // Bind use cases to camera
           cameraProvider.bindToLifecycle(
               this, cameraSelector, preview)

       } catch(exc: Exception) {
           Log.e(TAG, "Use case binding failed", exc)
       }

   }, ContextCompat.getMainExecutor(this))
}
- Create an instance of the
ProcessCameraProvider. This is used to bind the lifecycle of cameras to the lifecycle owner. This eliminates the task of opening and closing the camera since CameraX is lifecycle-aware.
val cameraProviderFuture = ProcessCameraProvider.getInstance(this)
- Add a listener to the
cameraProviderFuture. Add aRunnableas one argument. We will fill it in later. AddContextCompat.getMainExecutor()as the second argument. This returns anExecutorthat runs on the main thread.
cameraProviderFuture.addListener(Runnable {}, ContextCompat.getMainExecutor(this))
- In the
Runnable, add aProcessCameraProvider. This is used to bind the lifecycle of our camera to theLifecycleOwnerwithin the application's process.
val cameraProvider: ProcessCameraProvider = cameraProviderFuture.get()
- Initialize our
Previewobject, call build on it, get a surface provider from viewfinder, and then set it on the preview.
val preview = Preview.Builder()
   .build()
   .also {
       it.setSurfaceProvider(viewBinding.viewFinder.surfaceProvider)
   }
- Create a
CameraSelectorobject and selectDEFAULT_BACK_CAMERA.
val cameraSelector = CameraSelector.DEFAULT_BACK_CAMERA
- Create a
tryblock. Inside that block, make sure nothing is bound to thecameraProvider, and then bind ourcameraSelectorand preview object to thecameraProvider.
try {
   cameraProvider.unbindAll()
   cameraProvider.bindToLifecycle(
       this, cameraSelector, preview)
}
- There are a few ways this code could fail, like if the app is no longer in focus. Wrap this code in a
catchblock to log if there's a failure.
catch(exc: Exception) {
      Log.e(TAG, "Use case binding failed", exc)
}
- Run the app. We now see a camera preview!

5. Implement ImageCapture use case
Other use cases work in a very similar way as Preview. First, we define a configuration object that is used to instantiate the actual use case object. To capture photos, you'll implement the takePhoto() method, which is called when the Take photo button is pressed .
- Copy this code into the
takePhoto()method.
The bullet points below will break down the code we just copied.
private fun takePhoto() {
   // Get a stable reference of the modifiable image capture use case
   val imageCapture = imageCapture ?: return

   // Create time stamped name and MediaStore entry.
   val name = SimpleDateFormat(FILENAME_FORMAT, Locale.US)
              .format(System.currentTimeMillis())
   val contentValues = ContentValues().apply {
       put(MediaStore.MediaColumns.DISPLAY_NAME, name)
       put(MediaStore.MediaColumns.MIME_TYPE, "image/jpeg")
       if(Build.VERSION.SDK_INT > Build.VERSION_CODES.P) {
           put(MediaStore.Images.Media.RELATIVE_PATH, "Pictures/CameraX-Image")
       }
   }

   // Create output options object which contains file + metadata
   val outputOptions = ImageCapture.OutputFileOptions
           .Builder(contentResolver,
                    MediaStore.Images.Media.EXTERNAL_CONTENT_URI,
                    contentValues)
           .build()

   // Set up image capture listener, which is triggered after photo has
   // been taken
   imageCapture.takePicture(
       outputOptions,
       ContextCompat.getMainExecutor(this),
       object : ImageCapture.OnImageSavedCallback {
           override fun onError(exc: ImageCaptureException) {
               Log.e(TAG, "Photo capture failed: ${exc.message}", exc)
           }

           override fun
               onImageSaved(output: ImageCapture.OutputFileResults){
               val msg = "Photo capture succeeded: ${output.savedUri}"
               Toast.makeText(baseContext, msg, Toast.LENGTH_SHORT).show()
               Log.d(TAG, msg)
           }
       }
   )
}
- First, get a reference to the
ImageCaptureuse case. If the use case is null, exit out of the function. This will be null If we tap the photo button before image capture is set up. Without thereturnstatement, the app would crash if it wasnull.
val imageCapture = imageCapture ?: return
- Next, create a MediaStore content value to hold the image. Use a timestamp so the display name in MediaStore will be unique.
   val name = SimpleDateFormat(FILENAME_FORMAT, Locale.US)
              .format(System.currentTimeMillis())
   val contentValues = ContentValues().apply {
       put(MediaStore.MediaColumns.DISPLAY_NAME, name)
       put(MediaStore.MediaColumns.MIME_TYPE, "image/jpeg")
       if(Build.VERSION.SDK_INT > Build.VERSION_CODES.P) {
           put(MediaStore.Images.Media.RELATIVE_PATH, "Pictures/CameraX-Image")
       }
   }
- Create an
OutputFileOptionsobject. This object is where we can specify things about how we want our output to be. We want the output saved in the MediaStore so other apps could display it, so add our MediaStore entry.
val outputOptions = ImageCapture.OutputFileOptions
       .Builder(contentResolver,
                MediaStore.Images.Media.EXTERNAL_CONTENT_URI,
                contentValues)
       .build()
- Call
takePicture()on theimageCaptureobject. Pass inoutputOptions, the executor, and a callback for when the image is saved. You'll fill out the callback next.
imageCapture.takePicture(
   outputOptions, ContextCompat.getMainExecutor(this),
   object : ImageCapture.OnImageSavedCallback {}
)
- In the case that the image capture fails or saving the image capture fails, add in an error case to log that it failed.
override fun onError(exc: ImageCaptureException) {
   Log.e(TAG, "Photo capture failed: ${exc.message}", exc)
}
- If the capture doesn't fail, the photo was taken successfully! Save the photo to the file we created earlier, present a toast to let the user know it was successful, and print a log statement.
override fun onImageSaved(output: ImageCapture.OutputFileResults) {
   val savedUri = Uri.fromFile(photoFile)
   val msg = "Photo capture succeeded: $savedUri"
   Toast.makeText(baseContext, msg, Toast.LENGTH_SHORT).show()
   Log.d(TAG, msg)
}
- Go to the
startCamera()method and copy this code under the code for preview.
imageCapture = ImageCapture.Builder().build()
- Finally, update the call to
bindToLifecycle()in thetryblock to include the new use case:
cameraProvider.bindToLifecycle(
   this, cameraSelector, preview, imageCapture)
The method will look like this at this point:
private fun startCamera() {
   val cameraProviderFuture = ProcessCameraProvider.getInstance(this)

   cameraProviderFuture.addListener({
       // Used to bind the lifecycle of cameras to the lifecycle owner
       val cameraProvider: ProcessCameraProvider = cameraProviderFuture.get()

       // Preview
       val preview = Preview.Builder()
           .build()
           .also {
                 it.setSurfaceProvider(viewFinder.surfaceProvider)
           }

       imageCapture = ImageCapture.Builder()
           .build()

       // Select back camera as a default
       val cameraSelector = CameraSelector.DEFAULT_BACK_CAMERA

       try {
           // Unbind use cases before rebinding
           cameraProvider.unbindAll()

           // Bind use cases to camera
           cameraProvider.bindToLifecycle(
               this, cameraSelector, preview, imageCapture)

       } catch(exc: Exception) {
           Log.e(TAG, "Use case binding failed", exc)
       }

   }, ContextCompat.getMainExecutor(this))
}
- Rerun the app and press Take Photo. We should see a toast presented on the screen and a message in the logs.

View the photo
Now the newly captured photos are saved into MediaStore, we can use any MediaStore application to view them. For example, with Google Photos app, do:
- Start Google Photos
 .
. - Tap "Library"(unnecessary if not logged into the Photos app with your account) to see the sorted media files,
"CameraX-Image"folder is ours.
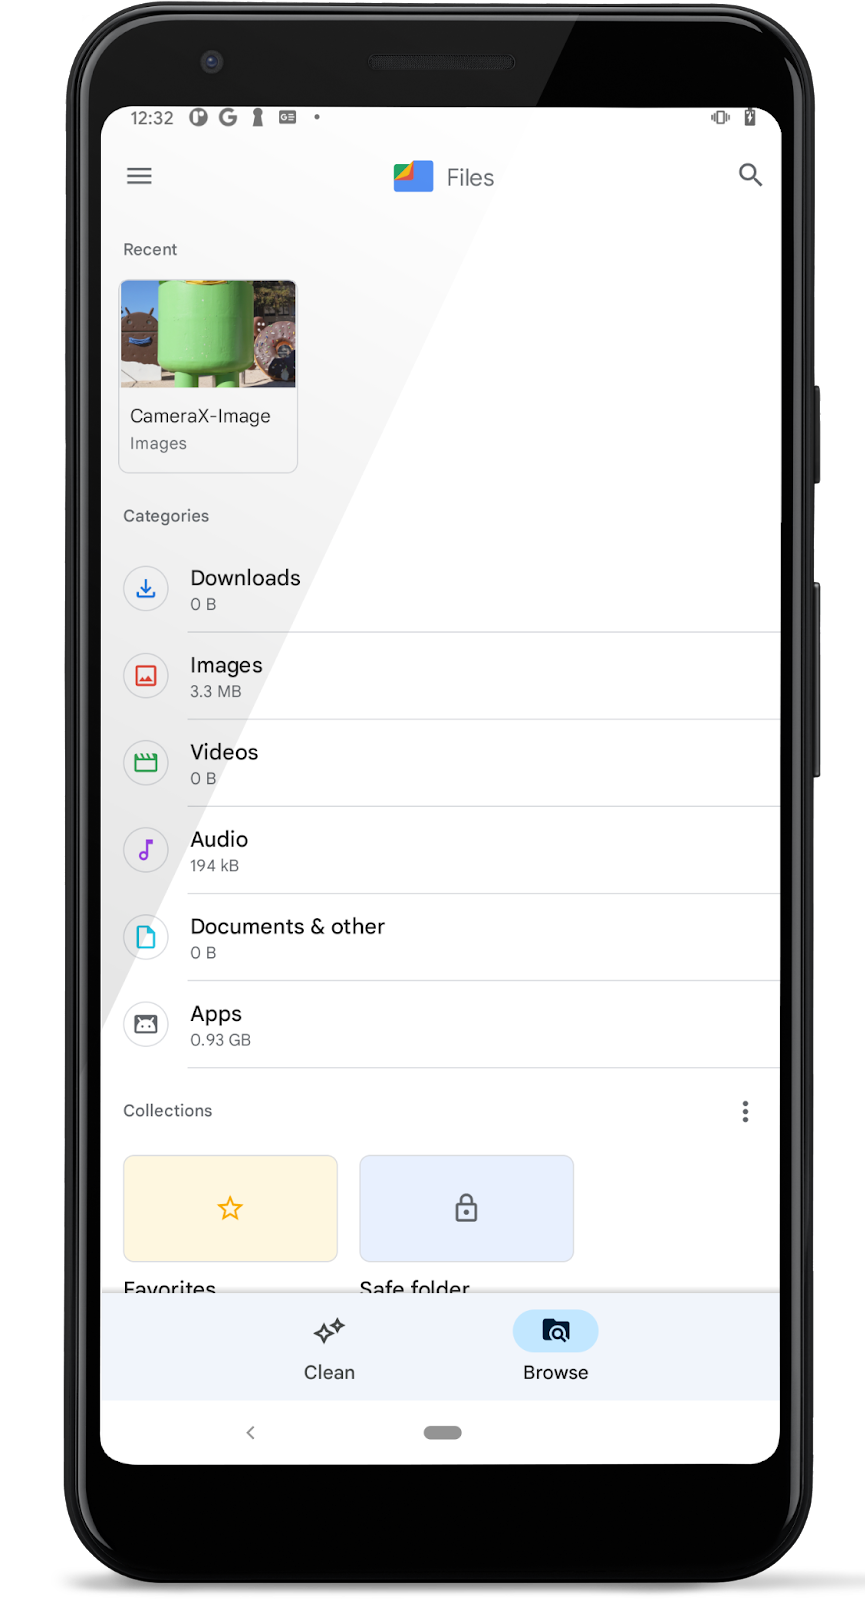

- Tap on the image icon to review the full photo; and tap the More button
 on the top-right corner to view the detail of the captured photo.


If we are just looking for a simple camera app to take photos, we are done. It's really that simple! If we are looking to implement an image analyzer, read on!
6. Implement ImageAnalysis use case
A great way to make our camera app more interesting is using the ImageAnalysis feature. It allows us to define a custom class that implements the ImageAnalysis.Analyzer interface, and which will be called with incoming camera frames. We won't have to manage the camera session state or even dispose of images; binding to our app's desired lifecycle is sufficient, like with other lifecycle-aware components.
- Add this analyzer in as an inner class in
MainActivity.kt. The analyzer logs the average luminosity of the image. To create an analyzer, we override theanalyzefunction in a class that implements theImageAnalysis.Analyzerinterface.
private class LuminosityAnalyzer(private val listener: LumaListener) : ImageAnalysis.Analyzer {

   private fun ByteBuffer.toByteArray(): ByteArray {
       rewind()    // Rewind the buffer to zero
       val data = ByteArray(remaining())
       get(data)   // Copy the buffer into a byte array
       return data // Return the byte array
   }

   override fun analyze(image: ImageProxy) {

       val buffer = image.planes[0].buffer
       val data = buffer.toByteArray()
       val pixels = data.map { it.toInt() and 0xFF }
       val luma = pixels.average()

       listener(luma)

       image.close()
   }
}
With our class implementing the ImageAnalysis.Analyzer interface, all we need to do is instantiate an instance of LuminosityAnalyzer in the ImageAnalysis, similar to other use cases, and update the startCamera() function once again, before the call to CameraX.bindToLifecycle():
- In the
startCamera()method, add this code under theimageCapturecode.
val imageAnalyzer = ImageAnalysis.Builder()
   .build()
   .also {
       it.setAnalyzer(cameraExecutor, LuminosityAnalyzer { luma ->
           Log.d(TAG, "Average luminosity: $luma")
       })
   }
- Update the
bindToLifecycle()call on thecameraProviderto include theimageAnalyzer.
cameraProvider.bindToLifecycle(
   this, cameraSelector, preview, imageCapture, imageAnalyzer)
The full method will now look like this:
private fun startCamera() {
   val cameraProviderFuture = ProcessCameraProvider.getInstance(this)

   cameraProviderFuture.addListener({
       // Used to bind the lifecycle of cameras to the lifecycle owner
       val cameraProvider: ProcessCameraProvider = cameraProviderFuture.get()

       // Preview
       val preview = Preview.Builder()
           .build()
           .also {
               it.setSurfaceProvider(viewBinding.viewFinder.surfaceProvider)
           }

       imageCapture = ImageCapture.Builder()
           .build()

       val imageAnalyzer = ImageAnalysis.Builder()
           .build()
           .also {
               it.setAnalyzer(cameraExecutor, LuminosityAnalyzer { luma ->
                   Log.d(TAG, "Average luminosity: $luma")
               })
           }

       // Select back camera as a default
       val cameraSelector = CameraSelector.DEFAULT_BACK_CAMERA

       try {
           // Unbind use cases before rebinding
           cameraProvider.unbindAll()

           // Bind use cases to camera
           cameraProvider.bindToLifecycle(
               this, cameraSelector, preview, imageCapture, imageAnalyzer)

       } catch(exc: Exception) {
           Log.e(TAG, "Use case binding failed", exc)
       }

   }, ContextCompat.getMainExecutor(this))
}
- Run the app now! It will produce a message similar to this in logcat approximately every second.
D/CameraXApp: Average luminosity: ...
7. Implement VideoCapture use case
CameraX added the VideoCapture use case in version 1.1.0-alpha10 and has been making further improvements since then. Note that the VideoCapture API supports many video capturing features, so to keep this codelab manageable, this codelab only demonstrates capturing video and audio to a MediaStore.
- Copy this code into the
captureVideo()method: it controls both the starting and the stopping of ourVideoCaptureuse case. The bullet points below will break down the code we just copied.
// Implements VideoCapture use case, including start and stop capturing.
private fun captureVideo() {
   val videoCapture = this.videoCapture ?: return

   viewBinding.videoCaptureButton.isEnabled = false

   val curRecording = recording
   if (curRecording != null) {
       // Stop the current recording session.
       curRecording.stop()
       recording = null
       return
   }

   // create and start a new recording session
   val name = SimpleDateFormat(FILENAME_FORMAT, Locale.US)
              .format(System.currentTimeMillis())
   val contentValues = ContentValues().apply {
       put(MediaStore.MediaColumns.DISPLAY_NAME, name)
       put(MediaStore.MediaColumns.MIME_TYPE, "video/mp4")
       if (Build.VERSION.SDK_INT > Build.VERSION_CODES.P) {
           put(MediaStore.Video.Media.RELATIVE_PATH, "Movies/CameraX-Video")
       }
   }

   val mediaStoreOutputOptions = MediaStoreOutputOptions
       .Builder(contentResolver, MediaStore.Video.Media.EXTERNAL_CONTENT_URI)
       .setContentValues(contentValues)
       .build()
   recording = videoCapture.output
       .prepareRecording(this, mediaStoreOutputOptions)
       .apply {
           if (PermissionChecker.checkSelfPermission(this@MainActivity,
                   Manifest.permission.RECORD_AUDIO) ==
               PermissionChecker.PERMISSION_GRANTED)
           {
               withAudioEnabled()
           }
       }
       .start(ContextCompat.getMainExecutor(this)) { recordEvent ->
           when(recordEvent) {
               is VideoRecordEvent.Start -> {
                   viewBinding.videoCaptureButton.apply {
                       text = getString(R.string.stop_capture)
                       isEnabled = true
                   }
               }
               is VideoRecordEvent.Finalize -> {
                   if (!recordEvent.hasError()) {
                       val msg = "Video capture succeeded: " +
                           "${recordEvent.outputResults.outputUri}"
                       Toast