

This tutorial shows you how to configure and deploy a sample API and the Extensible Service Proxy (ESP) running in prebuilt Docker containers on Compute Engine. The sample API is described using the OpenAPI specification. The tutorial also shows you how to create an API key and use it in requests to the API.
For an overview of Cloud Endpoints, see About Endpoints and Endpoints architecture.
Objectives
Use the following high-level task list as you work through the tutorial. All tasks are required to successfully send requests to the API.
- Set up a Google Cloud project. See Before you begin.
- Create a Compute Engine VM instance. See Creating a Compute Engine instance.
- Download the sample code. See Getting the sample code.
- Configure the
openapi.yamlfile, which is used to configure Endpoints. See Configuring Endpoints. - Deploy the Endpoints configuration to create a Endpoints service. See Deploying the Endpoints configuration.
- Deploy the API and ESP on the Compute Engine VM. See Deploying the API backend.
- Send a request to the API by using an IP address. See Sending a request by using IP address.
- Configure a DNS record for the sample API. See Configuring DNS for Endpoints.
- Send a request to the API by using the fully qualified domain name. See Sending a request by using FQDN.
- Track API activity. See Tracking API activity.
- Avoid incurring charges to your Google Cloud account. See Clean up.
Costs
In this document, you use the following billable components of Google Cloud:
To generate a cost estimate based on your projected usage,
use the pricing calculator.
When you finish the tasks that are described in this document, you can avoid continued billing by deleting the resources that you created. For more information, see Clean up.
Before you begin
-
In the Google Cloud console, on the project selector page, select or create a Google Cloud project.
Roles required to select or create a project
- Select a project: Selecting a project doesn't require a specific IAM role—you can select any project that you've been granted a role on.
-
Create a project: To create a project, you need the Project Creator role
(
roles/resourcemanager.projectCreator), which contains theresourcemanager.projects.createpermission. Learn how to grant roles.
-
Verify that billing is enabled for your Google Cloud project.
- Make a note of the project ID because it's needed later.
-
You need an application to send requests to the sample API.
- Linux and macOS users: This tutorial provides an example of using
curl, which typically comes pre-installed on your operating system. If you don't havecurl, you can download it from thecurlReleases and downloads page. - Windows users: This tutorial provides an example using
Invoke-WebRequest, which is supported in PowerShell 3.0 and later.
- Linux and macOS users: This tutorial provides an example of using
- Download the Google Cloud CLI.
-
Update the gcloud CLI and install the Endpoints
components.
gcloud components update
-
Make sure that the Google Cloud CLI (
gcloud) is authorized to access your data and services on Google Cloud:gcloud auth login
-
Set the default project to your project ID.
gcloud config set project YOUR_PROJECT_ID
Replace YOUR_PROJECT_ID with your project ID. If you have other Google Cloud projects, and you want to use
gcloudto manage them, see Managing gcloud CLI configurations.
When you finish the tasks that are described in this document, you can avoid continued billing by deleting the resources that you created. For more information, see Clean up.
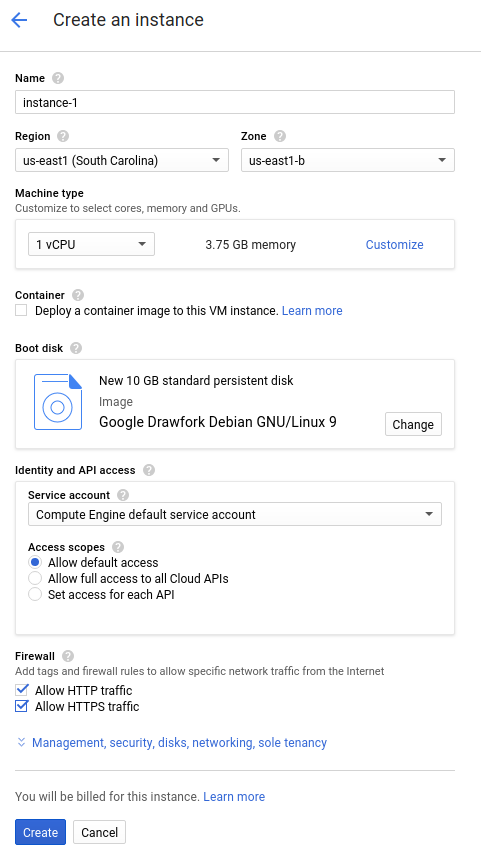
Creating a Compute Engine instance
- In the Google Cloud console, go to the Create an instance page.
- Click Select.
- In the Firewall section, select Allow HTTP traffic and Allow HTTPS traffic.
- To create the VM, click Create.
- Make sure you that you can connect to your VM instance.
To create a Compute Engine instance:
Allow a short time for the instance to start up. Once ready, it is listed on the VM Instances page with a green status icon.