If you’ve done a little work in Git and are starting to understand the basics we covered in our introduction to Git, but you want to learn to be more efficient and have more control, then this is the place for you!
In this tutorial, we’ll talk about how to address specific commits and entire ranges of commits, using the stash to save temporary work, comparing different commits, changing history, and how to clean up the mess if something doesn’t work out.
This article assumes you’ve worked through our first Git tutorial or at a minimum understand the basics of what Git is and how it works.
There’s a lot of ground to cover, so let’s get going.
Take the Quiz: Test your knowledge with our interactive “Advanced Git Tips for Python Developers” quiz. You’ll receive a score upon completion to help you track your learning progress:

Interactive Quiz
Advanced Git Tips for Python DevelopersTest your advanced Git skills: selecting revisions and ranges, stashing work, comparing commits, and rewriting local history safely.
Revision Selection
There are several options to tell Git which revision (or commit) you want to use. We’ve already seen that we can use a full SHA (25b09b9ccfe9110aed2d09444f1b50fa2b4c979c) and a short SHA (25b09b9cc) to indicate a revision.
We’ve also seen how you can use HEAD or a branch name to specify a particular commit as well. There are a few other tricks that Git has up its sleeve, however.
Relative Referencing
Sometimes it’s useful to be able to indicate a revision relative to a known position, like HEAD or a branch name. Git provides two operators that, while similar, behave slightly differently.
The first of these is the tilde (~) operator. Git uses tilde to point to a parent of a commit, so HEAD~ indicates the revision before the last one committed. To move back further, you use a number after the tilde: HEAD~3 takes you back three levels.
This works great until we run into merges. Merge commits have two parents, so the ~ just selects the first one. While that works sometimes, there are times when you want to specify the second or later parent. That’s why Git has the caret (^) operator.
The ^ operator moves to a specific parent of the specified revision. You use a number to indicate which parent. So HEAD^2 tells Git to select the second parent of the last one committed, not the “grandparent.” It can be repeated to move back further: HEAD^2^^ takes you back three levels, selecting the second parent on the first step. If you don’t give a number, Git assumes 1.
Note: Those of you using Windows will need to escape the ^ character on the DOS command line by using a second ^.
To make life even more fun and less readable, I’ll admit, Git allows you to combine these methods, so 25b09b9cc^2~3^3 is a valid way to indicate a revision if you’re walking back a tree structure with merges. It takes you to the second parent, then back three revisions from that, and then to the third parent.
Revision Ranges
There are a couple of different ways to specify ranges of commits for commands like git log. These don’t work exactly like slices in Python, however, so be careful!
Double Dot Notation
The “double dot” method for specifying ranges looks like it sounds: git log b05022238cdf08..60f89368787f0e. It’s tempting to think of this as saying “show me all commits after b05022238cdf08 up to and including 60f89368787f0e” and, if b05022238cdf08 is a direct ancestor of 60f89368787f0e, that’s exactly what it does.
Note: For the rest of this section, I will be replacing the SHAs of individual commits with capital letters as I think that makes the diagrams a little easier to follow. We’ll use this “fake” notation later as well.
It’s a bit more powerful than that, however. The double dot notation actually is showing you all commits that are included in the second commit that are not included in the first commit. Let’s look at a few diagrams to clarify:
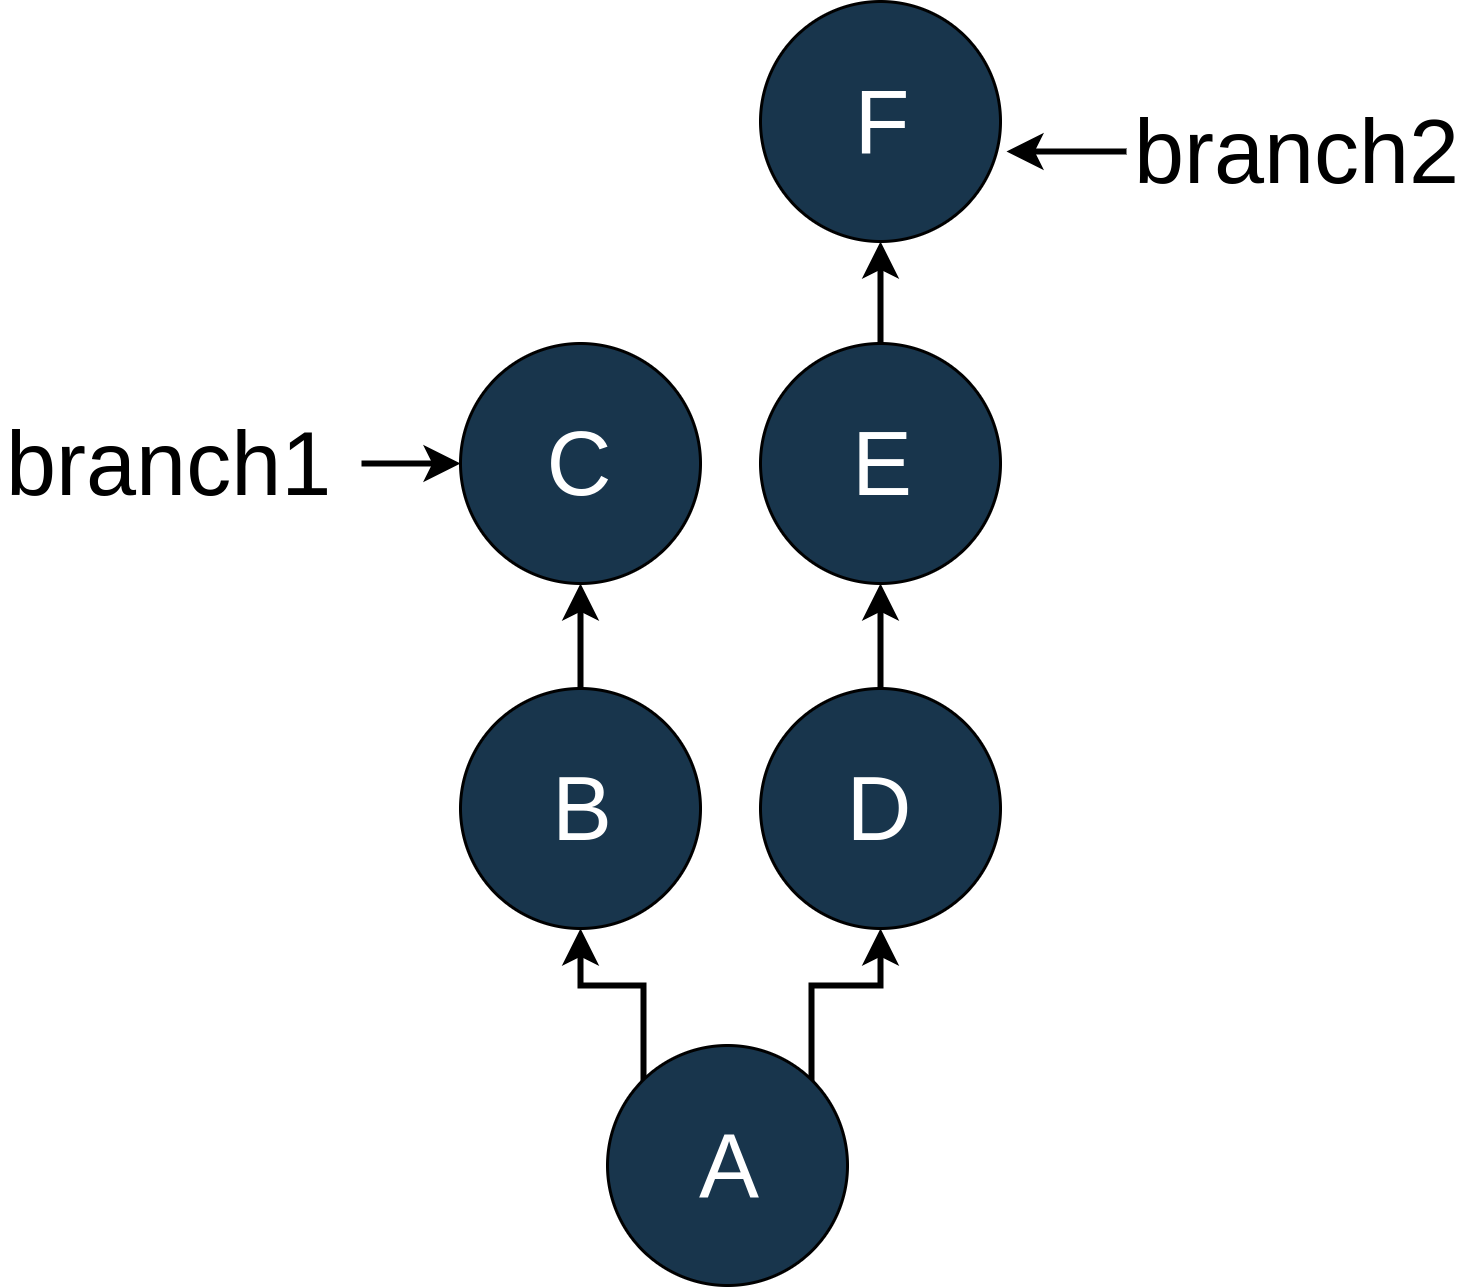
As you can see, we have two branches in our example repo, branch1 and branch2, which diverged after commit A. For starters, let’s look at the simple situation. I’ve modified the log output so that it matches the diagram:
$ git log --oneline D..F
E "Commit message for E"
F "Commit message for F"
D..F gives you all of the commits on branch2 after commit D.
A more interesting example, and one I learned about while writing this tutorial, is the following:
$ git log --oneline C..F
D "Commit message for D"
E "Commit message for E"
F "Commit message for F"
This shows the commits that are part of commit F that are not part of commit C. Because of the structure here, there is not a before/after relationship to these commits because they are on different branches.
What do you think you’ll get if you reverse the order of C and F?
$ git log --oneline F..C
B "Commit message for B"
C "Commit message for C"
Triple Dot
Triple dot notation uses, you guessed it, three dots between the revision specifiers. This works in a similar manner to the double dot notation except that it shows all commits that are in either revision that are not included in both revisions.
For our diagram above, using C...F shows you this:
$ git log --oneline C...F
D "Commit message for D"
E "Commit message for E"
F "Commit message for F"
B "Commit message for B"
C "Commit message for C"
Double and triple dot notation can be quite powerful when you want to use a range of commits for a command, but they’re not as straightforward as many people think.
Branches vs. HEAD vs. SHA
This is probably a good time to review what branches are in Git and how they relate to SHAs and HEAD.
HEAD is the name Git uses to refer to “where your file system is pointing right now.” Most of the time, this will be pointing to a named branch, but it does not have to be. To look at these ideas, let’s walk through an example. Suppose your history looks like this:

At this point, you discover that you accidentally committed a Python logging statement in commit B. Rats. Now, most people would add a new commit, E, push that to master and be done. But you are learning Git and want to fix this the hard way and hide the fact that you made a mistake in the history.
So you move HEAD back to B using git checkout B, which looks like this:

You can see that master hasn’t changed position, but HEAD now points to B. In the Intro to Git tutorial, we talked about the “detached HEAD” state. This is that state again!
Since you want to commit changes, you create a new branch with git checkout -b temp:

Now you edit the file and remove the offending log statement. Once that is done, you use git add and git commit --amend to modify commit B:

Whoa! There’s a new commit here called B'. Just like B, it has A as its parent, but C doesn’t know anything about it. Now we want master to be based on this new commit, B'.
Because you have a sharp memory, you remember that the rebase command does just that. So you get back to the master branch by typing git checkout master:

Once you’re on master, you can use git rebase temp to replay C and D on top of B:

You can see that the rebase created commits C' and D'. C' still has the same changes that C has, and D' has the same changes as D, but they have different SHAs because they are now based on B' instead of B.
As I mentioned earlier, you normally wouldn’t go to this much trouble just to fix an errant log statement, but there are times when this approach could be useful, and it does illustrate the differences between HEAD, commits, and branches.
More
Git has even more tricks up its sleeve, but I’ll stop here as I’ve rarely seen the other methods used in the wild. If you’d like to learn about how to do similar operations with more than two branches, checkout the excellent write-up on Revision Selection in the Pro Git book.
Handling Interruptions: git stash
One of the Git features I use frequently and find quite handy is the stash. It provides a simple mechanism to save the files you’re working on but are not ready to commit so you can switch to a different task. In this section, you’ll walk through a simple use case first, looking at each of the different commands and options, then you will wrap up with a few other use cases in which git stash really shines.
git stash save and git stash pop
Suppose you’re working on a nasty bug. You’ve got Python logging code in two files, file1 and file2, to help you track it down, and you’ve added file3 as a possible solution.
In short, the changes to the repo are as follows:
- You’ve edited
file1and donegit add file1. - You’ve edited
file2but have not added it. - You’ve created
file3and have not added it.
You do a git status to confirm the condition of the repo:
$ git status
On branch master
Changes to be committed:
  (use "git reset HEAD <file>..." to unstage)

   modified:   file1

Changes not staged for commit:
  (use "git add <file>..." to update what will be committed)
  (use "git checkout -- <file>..." to discard changes in working directory)

   modified:   file2

Untracked files:
  (use "git add <file>..." to include in what will be committed)

   file3
Now a coworker (aren’t they annoying?) walks up and tells you that production is down and it’s “your turn.” You know you can break out your mad git stash skills to save you some time and save the day.
You haven’t finished with the work on files 1, 2, and 3, so you really don’t want to commit those changes but you need to get them off of your working directory so you can switch to a different branch to fix that bug. This is the most basic use case for git stash.
You can use git stash save to “put those changes away” for a little while and return to a clean working directory. The default option for stash is save so this is usually written as just git stash.
When you save something to stash, it creates a unique storage spot for those changes and returns your working directory to the state of the last commit. It tells you what it did with a cryptic message:
$ git stash save
Saved working directory and index state WIP on master: 387dcfc adding some files
HEAD is now at 387dcfc adding some files
In that output, master is the name of the branch, 387dcfc is the SHA of the last commit, adding some files is the commit message for that commit, and WIP stands for “work in progress.” The output on your repo will likely be different in those details.
If you do a status at this point, it will still show file3 as an untracked file, but file1 and file2 are no longer there:
$ git status
On branch master
Untracked files:
  (use "git add <file>..." to include in what will be committed)

   file3

nothing added to commit but untracked files present (use "git add" to track)
At this point, as far as Git is concerned, your working directory is “clean,” and you are free to do things like check out a different branch, cherry-pick changes, or anything else you need to.
You go and check out the other branch, fix the bug, earn the admiration of your coworkers, and now are ready to return to this work.
How do you get the last stash back? git stash pop!
Using the pop command at this point looks like this:
$ git stash pop
On branch master
Changes not staged for commit:
  (use "git add <file>..." to update what will be committed)
  (use "git checkout -- <file>..." to discard changes in working directory)

   modified:   file1
   modified:   file2

Untracked files:
  (use "git add <file>..." to include in what will be committed)

   file3

no changes added to commit (use "git add" and/or "git commit -a")
Dropped refs/stash@{0} (71d0f2469db0f1eb9ee7510a9e3e9bd3c1c4211c)
Now you can see at the bottom that it has a message about “Dropped refs/stash@{0}”. We’ll talk more about that syntax below, but it’s basically saying that it applied the changes you had stashed and got rid of the stash itself. Before you ask, yes, there is a way to use the stash and not get rid of it, but let’s not get ahead of ourselves.
You’ll notice that file1 used to be in the index but no longer is. By default, git stash pop doesn’t maintain the status of changes like that. There is an option to tell it to do so, of course. Add file1 back to the index and try again:
$ git add file1
$ git status
On branch master
Changes to be committed:
  (use "git reset HEAD <file>..." to unstage)

   modified:   file1

Changes not staged for commit:
  (use "git add <file>..." to update what will be committed)
  (use "git checkout -- <file>..." to discard changes in working directory)

   modified:   file2

Untracked files:
  (use "git add <file>..." to include in what will be committed)

   file3

$ git stash save "another try"
Saved working directory and index state On master: another try
HEAD is now at 387dcfc adding some files
$ git stash pop --index
On branch master
Changes to be committed:
  (use "git reset HEAD <file>..." to unstage)

   modified:   file1

Changes not staged for commit:
  (use "git add <file>..." to update what will be committed)
  (use "git checkout -- <file>..." to discard changes in working directory)

   modified:   file2

Untracked files:
  (use "git add <file>..." to include in what will be committed)

   file3

Dropped refs/stash@{0} (aed3a02aeb876c1137dd8bab753636a294a3cc43)
You can see that the second time we added the --index option to the git pop command, which tells it to try to maintain the status of whether or not a file is in the index.
In the previous two attempts, you probably noticed that file3 was not included in your stash. You might want to keep file3 together with those other changes. Fortunately, there is an option to help you with that: --include-untracked.
Assuming we’re back to where we were at the end of the last example, we can re-run the command:
$ git stash save --include-untracked "third attempt"
Saved working directory and index state On master: third attempt
HEAD is now at 387dcfc adding some files
$ git status
On branch master
nothing to commit, working directory clean
This put the untracked file3 into the stash with our other changes.
Before we move on, I just want to point out that save is the default option for git stash. Unless you’re specifying a message, which we’ll discuss later, you can simply use git stash, and it will do a save.
git stash list
One of the powerful features of git stash is that you can have more than one of them. Git stores stashes in a stack, which means that by default it always works with the most recently saved stash. The git stash list command will show you the stack of stashes in your local repo. Let’s create a couple of stashes so we can see how this works:
$ echo "editing file1" >> file1
$ git stash save "the first save"
Saved working directory and index state On master: the first save
HEAD is now at b3e9b4d adding file3
$ # you can see that stash save cleaned up our working directory
$ # now create a few more stashes by "editing" files and saving them
$ echo "editing file2" >> file2
$ git stash save "the second save"
Saved working directory and index state On master: the second save
HEAD is now at b3e9b4d adding file3
$ echo "editing file3" >> file3
$ git stash save "the third save"
Saved working directory and index state On master: the third save
HEAD is now at b3e9b4d adding file3
$ git status
On branch master
nothing to commit, working directory clean
You now have three different stashes saved. Fortunately, Git has a system for dealing with stashes that makes this easy to deal with. The first step of the system is the git stash list command:
$ git stash list
stash@{0}: On master: the third save
stash@{1}: On master: the second save
stash@{2}: On master: the first save
List shows you the stack of stashes you have in this repo, the newest one first. Notice the stash@{n} syntax at the start of each entry? That’s the name of that stash. The rest of the git stash subcommand will use that name to refer to a specific stash. Generally if you don’t give a name, it always assumes you mean the most recent stash, stash@{0}. You’ll see more of this in a bit.
Another thing I’d like to point out here is that you can see the message we used when we did the git stash save "message" command in the listing. This can be quite helpful if you have a number of things stashed.
As we mentioned above, the save [name] portion of the git stash save [name] command is not required. You can simply type git stash, and it defaults to a save command, but the auto-generated message doesn’t give you much information:
$ echo "more editing file1" >> file1
$ git stash
Saved working directory and index state WIP on master: 387dcfc adding some files
HEAD is now at 387dcfc adding some files
$ git stash list
stash@{0}: WIP on master: 387dcfc adding some files
stash@{1}: On master: the third save
stash@{2}: On master: the second save
stash@{3}: On master: the first save
The default message is WIP on <branch>: <SHA> <commit message>., which doesn’t tell you much. If we had done that for the first three stashes, they all would have had the same message. That’s why, for the examples here, I use the full git stash save <message> syntax.
git stash show
Okay, so now you have a bunch of stashes, and you might even have meaningful messages describing them, but what if you want to see exactly what’s in a particular stash? That’s where the git stash show command comes in. Using the default options tells you how many files have changed, as well as which files have changed:
$ git stash show stash@{2}
 file1 | 1 +
 1 file changed, 1 insertion(+)
The default options do not tell you what the changes were, however. Fortunately, you can add the -p/--patch option, and it will show you the diffs in “patch” format:
$ git stash show -p stash@{2}
diff --git a/file1 b/file1
index e212970..04dbd7b 100644
--- a/file1
+++ b/file1
@@ -1 +1,2 @@
 file1
+editing file1
Here it shows you that the line “editing file1” was added to file1. If you’re not familiar with the patch format for displaying diffs, don’t worry. When you get to the git difftool section below, you’ll see how to bring up a visual diff tool on a stash.
git stash pop vs. git stash apply
You saw earlier how to pop the most recent stash back into your working directory by using the git stash pop command. You probably guessed that the stash name syntax we saw earlier also applies to the pop command:
$ git stash list
stash@{0}: On master: the third save
stash@{1}: On master: the second save
stash@{2}: On master: the first save
$ git stash pop stash@{1}
On branch master
Changes not staged for commit:
  (use "git add <file>..." to update what will be committed)
  (use "git checkout -- <file>..." to discard changes in working directory)
while read line; do echo -n "$line" | wc -c; done<
   modified:   file2

no changes added to commit (use "git add" and/or "git commit -a")
Dropped stash@{1} (84f7c9890908a1a1bf3c35acfe36a6ecd1f30a2c)
$ git stash list
stash@{0}: On master: the third save
stash@{1}: On master: the first save
You can see that the git stash pop stash@{1} put “the second save” back into our working directory and collapsed our stack so that only the first and third stashes are there. Notice how “the first save” changed from stash@{2} to stash@{1} after the pop.
It’s also possible to put a stash onto your working directory but leave it in the stack as well. This is done with git stash apply:
$ git stash list
stash@{0}: On master: the third save
stash@{1}: On master: the first save
$ git stash apply stash@{1}
On branch master
Changes not staged for commit:
  (use "git add <file>..." to update what will be committed)
  (use "git checkout -- <file>..." to discard changes in working directory)

   modified:   file1
   modified:   file2

no changes added to commit (use "git add" and/or "git commit -a")
$ git stash list
stash@{0}: On master: the third save
stash@{1}: On master: the first save
This can be handy if you want to apply the same set of changes multiple times. I recently used this while working on prototype hardware. There were changes needed to get the code to work on the particular hardware on my desk, but none of the others. I used git stash apply to apply these changes each time I brought down a new copy of master.
git stash drop
The last stash subcommand to look at is drop. This is useful when you want to throw away a stash and not apply it to your working directory. It looks like this:
$ git status
On branch master
nothing to commit, working directory clean
$ git stash list
stash@{0}: On master: the third save
stash@{1}: On master: the first save
$ git stash drop stash@{1}
Dropped stash@{1} (9aaa9996bd6aa363e7be723b4712afaae4fc3235)
$ git stash drop
Dropped refs/stash@{0} (194f99db7a8fcc547fdd6d9f5fbffe8b896e2267)
$ git stash list
$ git status
On branch master
nothing to commit, working directory clean
This dropped the last two stashes, and Git did not change your working directory. There are a couple of things to notice in the above example. First, the drop command, like most of the other git stash commands, can use the optional stash@{n} names. If you don’t supply it, Git assumes stash@{0}.
The other interesting thing is that the output from the drop command gives you a SHA. Like other SHAs in Git, you can make use of this. If, for example, you really meant to do a pop and not a drop on stash@{1} above, you can create a new branch with that SHA it showed you (9aaa9996):
$ git branch tmp 9aaa9996
$ git status
On branch master
nothing to commit, working directory clean
$ # use git log <branchname> to see commits on that branch
$ git log tmp
commit 9aaa9996bd6aa363e7be723b4712afaae4fc3235
Merge: b3e9b4d f2d6ecc
Author: Jim Anderson <your_email_here@gmail.com>
Date:   Sat May 12 09:34:29 2018 -0600

    On master: the first save
[rest of log deleted for brevity]
Once you have that branch, you can use the git merge or other techniques to get those changes back to your branch. If you didn’t save the SHA from the git drop command, there are other methods to attempt to recover the changes, but they can get complicated. You can read more about it here.
git stash Example: Pulling Into a Dirty Tree
Let’s wrap up this section on git stash by looking at one of its uses that wasn’t obvious to me at first. Frequently when you’re working on a shared branch for a longer period of time, another developer will push changes to the branch that you want to get to your local repo. You’ll remember that we use the git pull command to do this. However, if you have local changes in files that the pull will modify, Git refuses with an error message explaining what went wrong:
error: Your local changes to the following files would be overwritten by merge:
   <list of files that conflict>
Please, commit your changes or stash them before you can merge.
Aborting
You could commit this and then do a pull , but that would create a merge node, and you might not be ready to commit those files. Now that you know git stash, you can use it instead:
$ git stash
Saved working directory and index state WIP on master: b25fe34 Cleaned up when no TOKEN is present. Added ignored tasks
HEAD is now at <SHA> <commit message>
$ git pull
Updating <SHA1>..<SHA2>
Fast-forward
  <more info here>
$ git stash pop
On branch master
Your branch is up-to-date with 'origin/master'.
Changes not staged for commit:
   <rest of stash pop output trimmed>
It’s entirely possible that doing the git stash pop command will produce a merge conflict. If that’s the case, you’ll need to hand-edit the conflict to resolve it, and then you can proceed. We’ll discuss resolving merge conflicts below.
Comparing Revisions: git diff
The git diff command is a powerful feature that you’ll find yourself using quite frequently. I looked up the list of things it can compare and was surprised by the list. Try typing git diff --help if you’d like to see for yourself. I won’t cover all of those use cases here, as many of them aren’t too common.
This section has several use cases with the diff command, which displays on the command line. The next section shows how you can set Git up to use a visual diff tool like Meld, Windiff, BeyondCompare, or even extensions in your IDE. The options for diff and difftool are the same, so most of the discussion in this section will apply there too, but it’s easier to show the output on the command line version.
The most common use of git diff is to see what you have modified in your working directory:
$ echo "I'm editing file3 now" >> file3
$ git diff
diff --git a/file3 b/file3
index faf2282..c5dd702 100644
--- a/file3
+++ b/file3
@@ -1,3 +1,4 @@
{other contents of files3}
+I'm editing file3 now