To learn how to install Python on your system, you can follow a few straightforward steps. First, check if Python is already installed by opening a command-line interface and typing python --version or python3 --version.
You can install Python on Windows using the official installer from Python.org or through the Microsoft Store. On macOS, you can use the official installer or Homebrew. For Linux, use your package manager or build Python from source.
By the end of this tutorial, you’ll understand how to:
- Check if Python is installed by running
python --versionorpython3 --versionin a command-line interface. - Upgrade Python by downloading and installing the latest version from Python.org.
- Install and manage multiple Python versions with
pyenvto keep them separate.
This tutorial covers installing the latest Python on the most important platforms or operating systems, such as Windows, macOS, Linux, iOS, and Android. However, it doesn’t cover all the existing Linux distributions, as that would be a massive task. Nevertheless, you’ll find instructions for the most popular distributions available today.
To get the most out of this tutorial, you should be comfortable using your operating system’s terminal or command line.
Free Bonus: Click here to get a Python Cheat Sheet and learn the basics of Python 3, like working with data types, dictionaries, lists, and Python functions.
Take the Quiz: Test your knowledge with our interactive “How to Install Python on Your System: A Guide” quiz. You’ll receive a score upon completion to help you track your learning progress:

Interactive Quiz
How to Install Python on Your System: A GuideIn this quiz, you'll test your understanding of how to install or update Python on your computer. With this knowledge, you'll be able to set up Python on various operating systems, including Windows, macOS, and Linux.
Windows: How to Check or Get Python
In this section, you’ll learn to check whether Python is installed on your Windows operating system (OS) and which version you have. You’ll also explore three installation options that you can use on Windows.
Note: In this tutorial, you’ll focus on installing the latest version of Python in your current operating system (OS) rather than on installing multiple versions of Python. If you want to install several versions of Python in your OS, then check out the Managing Multiple Python Versions With pyenv tutorial. Note that on Windows machines, you’d have to use pyenv-win instead of pyenv.
For a more comprehensive guide on setting up a Windows machine for Python programming, check out Your Python Coding Environment on Windows: Setup Guide.
Checking the Python Version on Windows
To check whether you already have Python on your Windows machine, open a command-line application like PowerShell or the Windows Terminal.
Follow the steps below to open PowerShell on Windows:
- Press the Win key.
- Type
PowerShell. - Press Enter.
Alternatively, you can right-click the Start button and select Windows PowerShell or Windows PowerShell (Admin). In some versions of Windows, you’ll find Terminal or Terminal (admin).
Note: To learn more about your options for the Windows terminal, check out Your Python Coding Environment on Windows: Setup Guide.
With the command line open, type in the following command and press the Enter key:
PS> python --version
Python 3.x.z
Using the --version switch will show you the installed version. Note that the 3.x.z part is a placeholder here. In your machine, x and z will be numbers corresponding to the specific version you have installed.
Alternatively, you can use the -V switch:
PS> python -V
Python 3.x.z
You can also use the py launcher, which is the Python launcher for Windows and is especially helpful if you plan to work with multiple Python versions:
PS> py --version
Python 3.x.z
Using the python --version, python -V, or py --version command, you can check whether Python is installed on your system and learn what version you have. If Python isn’t installed on your OS, you’ll get an error message.
Python versions follow a major.minor.micro pattern, and each part changes for a different kind of release, with very different consequences when you upgrade. Click through the parts below to see what each one means:
For everyday use, aim for the latest micro release of the current feature version. This way, you’ll have the latest bug fixes and security patches without breaking your existing code.
Knowing the Python Installation Options on Windows
Python 3.14 introduced the Python Install Manager, which is a modern installation system that handles version management and automatic updates. This new tool is available through the Microsoft Store and Python.org. It’ll replace the traditional installer that’s been deprecated and won’t be produced for Python 3.16 or later.
You’ll have different options to install Python on a Windows machine:
- The Microsoft Store: The recommended installation method for Python 3.14+. It delivers the Python Install Manager with automatic updates and integrated version management.
- The traditional Python installer for Windows: The traditional installer from Python.org. While still functional, this method is considered legacy and has been deprecated in favor of the Python Install Manager.
- The Windows Subsystem for Linux (WSL): Run Python in a Linux environment directly on Windows.
In this section, you’ll focus on only the first two options, which are the most popular ones on Windows environments.
Note: You can also complete the installation on Windows using alternative distributions, such as Anaconda, but this tutorial covers only official distributions.
Anaconda is a popular platform for scientific computing and data science with Python. To learn how to install Anaconda on Windows, check out the Setting Up Python for Machine Learning on Windows tutorial.
If you want to install Python in the WSL, you can read the Linux-related sections of this tutorial after installing the Linux distribution of your choice.
Windows: How to Install Python From the Microsoft Store
If you’re looking for the quickest and most modern installation approach, then you can install Python from the Microsoft Store. For Python 3.14+, the Microsoft Store delivers the Python Install Manager, which provides automatic updates and integrated version management.
The Python Install Manager from the Microsoft Store is identical to the one that you download from Python.org, with the same features and capabilities. According to the official Python documentation, both channels give you the same tool, so you can pick whichever one suits you.
Note: If you’re installing Python 3.13 or earlier from the Microsoft Store, be aware that those versions have some limitations with write access to shared system locations. These limitations were addressed in Python 3.14’s Python Install Manager.
The main advantage of the Microsoft Store version is convenience because it integrates with Windows’ app management system and handles updates automatically.
Step 1: Open the Python App Page on the Microsoft Store
Open the Microsoft Store application on your Windows machine and search for the Python Install Manager app. Select the app to navigate to its page.
Note: Make sure that the application you’ve selected is by the Python Software Foundation (PSF), which is the organization behind Python’s development.
The official Python Install Manager app on the Microsoft Store is free, so if the app costs you money, then it’s the wrong application.
Once you’re there, you’re ready to start with the installation process.
Step 2: Install the Python Install Manager App
After you’ve selected the Python Install Manager app, follow these steps to complete the installation:
- Click the Get button.
- Wait for the app to download.
- Click the Open button.
When you click the Open button, you’ll be presented with a terminal window. Follow the on-screen instructions to complete the installation.
Once the installation is complete, open Windows PowerShell and run the python --version command to confirm that Python is installed on your machine. Note that the installation will reside in your user folder, so you don’t need admin privileges to complete the process.
Along with the Python interpreter, you can access a few other tools, including the py launcher, pip, and IDLE!
Windows: How to Install Python Using the Traditional Installer
The traditional installer from Python.org has been the standard installation method for many years. According to the official Python documentation, this installer is:
[…] deprecated since 3.14 and will not be produced for Python 3.16 or later (Source)
With the Python Install Manager recommended as the modern replacement. However, understanding this installation process is still valuable, especially if you’re working with existing Python installations or earlier versions.
In this section, you’ll go through the necessary steps to install Python using the traditional installer from Python.org.
Step 1: Download the Traditional Python Installer
Follow the steps below to download the traditional Python installer from the Python.org site:
- Open your browser and navigate to the downloads page for Windows on Python.org.
- Under the Python Releases for Windows heading, click the link for the Latest Python 3 Release - Python 3.x.z.
- Scroll to the bottom and select Windows installer (64-bit), Windows installer (32-bit), or Windows installer (ARM64) according to your system architecture.
Note: If you visit Python.org and hover your mouse over the Downloads menu, a box will appear showing the latest release of Python available for your current computer. This provides a quick way to download the appropriate installer without navigating through multiple pages.
When you finish downloading the installer, then you can move on to the next step.
Step 2: Run the Python Installer
Once you’ve chosen and downloaded an installer, run it by double-clicking on the file. An installation wizard like the one below will appear on your screen:
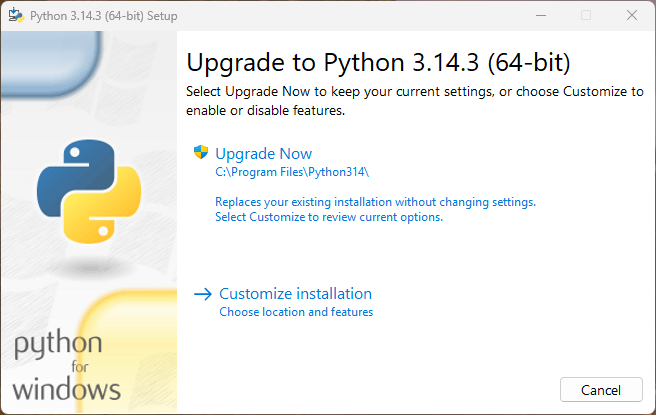
There are a couple of things to notice about the wizard’s initial window:
- The default install path is in the current user’s
AppData\Local\Programs\Python\Python314\directory, which doesn’t require admin privileges. - The Customize installation button allows you to tweak some additional features, including installing the Python documentation,
pip, IDLE, the test suite, and thepylauncher. It also allows you to decide whether you want to install Python for all users, which requires admin privileges.
You can also customize some advanced options, including file association, shortcuts creation, adding Python to the system environment variables, and even using a custom install location if you don’t have admin privileges.
As you can conclude, the Python installer gives you granular control over the installation process on Windows.
Note: If you want the python command to work on your Windows machine, then make sure that the Add Python to environment variables check box is activated, which is the default.
Use the options in the dialog box to customize the installation to meet your needs. Then click Install. That’s it! You now have the latest version of Python on your Windows machine!
If you’re curious to know where the installation is located, then use the where.exe command in PowerShell:
PS> where.exe python
C:\Users\realpython\AppData\Local\Programs\Python\Python314\python.exe
Note that the where.exe command will work only if Python has been installed for your user account.
macOS: How to Check or Get Python
Python comes preinstalled on macOS, but it’s an older and incomplete build that Apple provides for its own development tools, so it may not be the most recent version. To take advantage of Python’s latest features, you’ll need to download and install newer versions alongside the system one. Note that Python 3.14 requires macOS 10.15 Catalina or later to work properly.
Checking the Python Version on macOS
To check which Python version you have on your Mac, open a command-line application like Terminal.
Here’s how you open Terminal on macOS:
- Press the Cmd+Space keys.
- Type
Terminal. - Press Enter.
Alternatively, you can open Finder and navigate to Go → Utilities → Terminal.
With the command line open, type in the following commands: