UI API
The cli-ui exposes an API that allows augmenting the project configurations and tasks, as well as sharing data and communicating with other processes.
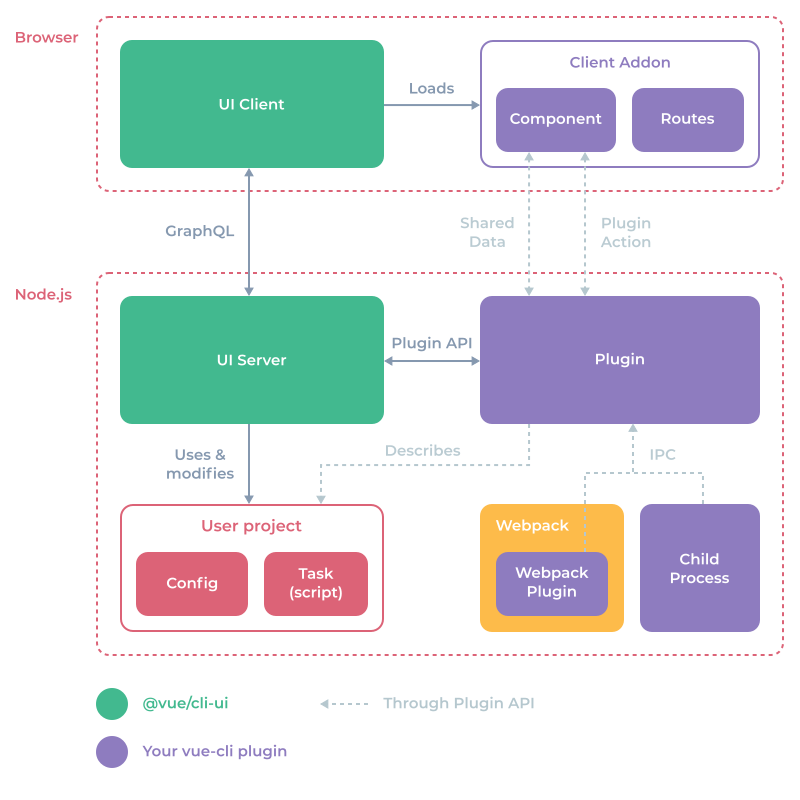
UI files
Inside each installed vue-cli plugins, the cli-ui will try to load an optional ui.js file in the root folder of the plugin. Note that you can also use folders (for example ui/index.js).
The file should export a function which gets the api object as argument:
module.exports = api => {
  // Use the API here...
}
⚠️ The files will be reloaded when fetching the plugin list in the 'Project plugins' view. To apply changes, click on the 'Project plugins' button in the navigation sidebar on the left in the UI.
Here is an example folder structure for a vue-cli plugin using the UI API:
- vue-cli-plugin-test
  - package.json
  - index.js
  - generator.js
  - prompts.js
  - ui.js
  - logo.png
Project local plugins
If you need access to the plugin API in your project and don't want to create a full plugin for it, you can use the vuePlugins.ui option in your package.json file:
{
  "vuePlugins": {
    "ui": ["my-ui.js"]
  }
}
Each file will need to export a function taking the plugin API as the first argument.
Dev mode
While building your plugin, you may want to run the cli-ui in Dev mode, so it will output useful logs to you:
vue ui --dev
Or:
vue ui -D
Project configurations

You can add a project configuration with the api.describeConfig method.
First you need to pass some information:
api.describeConfig({
  // Unique ID for the config
  id: 'org.vue.eslintrc',
  // Displayed name
  name: 'ESLint configuration',
  // Shown below the name
  description: 'Error checking & Code quality',
  // "More info" link
  link: 'https://eslint.org'
})
WARNING
Make sure to namespace the id correctly, since it must be unique across all plugins. It's recommended to use the reverse domain name notation.
Config icon
It can be either a Material icon code or a custom image (see Public static files):
api.describeConfig({
  /* ... */
  // Config icon
  icon: 'application_settings'
})
If you don't specify an icon, the plugin logo will be displayed if any (see Logo).
Config files
By default, a configuration UI might read and write to one or more configuration files, for example both .eslintrc.js and vue.config.js.
You can provide what are the possible files to be detected in the user project:
api.describeConfig({
  /* ... */
  // All possible files for this config
  files: {
    // eslintrc.js
    eslint: {
      js: ['.eslintrc.js'],
      json: ['.eslintrc', '.eslintrc.json'],
      // Will read from `package.json`
      package: 'eslintConfig'
    },
    // vue.config.js
    vue: {
      js: ['vue.config.js']
    }
  },
})
Supported types: json, yaml, js, package. The order is important: the first filename in the list will be used to create the config file if it doesn't exist.
Display config prompts
Use the onRead hook to return a list of prompts to be displayed for the configuration:
api.describeConfig({
  /* ... */
  onRead: ({ data, cwd }) => ({
    prompts: [
      // Prompt objects
    ]
  })
})
Those prompts will be displayed in the configuration details pane.
See Prompts for more info.
The data object contains the JSON result of each config file content.
For example, let's say the user has the following vue.config.js in their project:
module.exports = {
  lintOnSave: false
}
We declare the config file in our plugin like this:
api.describeConfig({
  /* ... */
  // All possible files for this config
  files: {
    // vue.config.js
    vue: {
      js: ['vue.config.js']
    }
  },
})
Then the data object will be:
{
  // File
  vue: {
    // File data
    lintOnSave: false
  }
}
Multiple files example: if we add the following eslintrc.js file in the user project:
module.exports = {
  root: true,
  extends: [
    'plugin:vue/essential',
    '@vue/standard'
  ]
}
And change the files option in our plugin to this:
api.describeConfig({
  /* ... */
  // All possible files for this config
  files: {
    // eslintrc.js
    eslint: {
      js: ['.eslintrc.js'],
      json: ['.eslintrc', '.eslintrc.json'],
      // Will read from `package.json`
      package: 'eslintConfig'
    },
    // vue.config.js
    vue: {
      js: ['vue.config.js']
    }
  },
})
Then the data object will be:
{
  eslint: {
    root: true,
    extends: [
      'plugin:vue/essential',
      '@vue/standard'
    ]
  },
  vue: {
    lintOnSave: false
  }
}
Configuration tabs
You can organize the prompts into several tabs:
api.describeConfig({
  /* ... */
  onRead: ({ data, cwd }) => ({
    tabs: [
      {
        id: 'tab1',
        label: 'My tab',
        // Optional
        icon: 'application_settings',
        prompts: [
          // Prompt objects
        ]
      },
      {
        id: 'tab2',
        label: 'My other tab',
        prompts: [
          // Prompt objects
        ]
      }
    ]
  })
})
Save config changes
Use the onWrite hook to write the data to the configuration file (or execute any nodejs code):
api.describeConfig({
  /* ... */
  onWrite: ({ prompts, answers, data, files, cwd, api }) => {
    // ...
  }
})
Arguments:
prompts: current prompts runtime objects (see below)answers: answers data from the user inputsdata: read-only initial data read from the config filesfiles: descriptors of the found files ({ type: 'json', path: '...' })cwd: current working directoryapi:onWrite API(see below)
Prompts runtime objects:
{
  id: data.name,
  type: data.type,
  name: data.short || null,
  message: data.message,
  group: data.group || null,
  description: data.description || null,
  link: data.link || null,
  choices: null,
  visible: true,
  enabled: true,
  // Current value (not filtered)
  value: null,
  // true if changed by user
  valueChanged: false,
  error: null,
  tabId: null,
  // Original inquirer prompt object
  raw: data
}
onWrite API:
assignData(fileId, newData): useObject.assignto update the config data before writing.setData(fileId, newData): each key ofnewDatawill be deeply set (or removed ifundefinedvalue) to the config data before writing.async getAnswer(id, mapper): retrieve answer for a given prompt id and map it throughmapperfunction if provided (for exampleJSON.parse).
Example (from the ESLint plugin):
api.describeConfig({
  // ...

  onWrite: async ({ api, prompts }) => {
    // Update ESLint rules
    const result = {}
    for (const prompt of prompts) {
      result[`rules.${prompt.id}`] = await api.getAnswer(prompt.id, JSON.parse)
    }
    api.setData('eslint', result)
  }
})
Project tasks

Tasks are generated from the scripts field in the project package.json file.
You can 'augment' the tasks with additional info and hooks thanks to the api.describeTask method:
api.describeTask({
  // RegExp executed on script commands to select which task will be described here
  match: /vue-cli-service serve/,
  description: 'Compiles and hot-reloads for development',
  // "More info" link
  link: 'https://github.com/vuejs/vue-cli/blob/dev/docs/cli-service.md#serve'
})
You can also use a function for match:
api.describeTask({
  match: (command) => /vue-cli-service serve/.test(command),
})
Task icon
It can be either a Material icon code or a custom image (see Public static files):
api.describeTask({
  /* ... */
  // Task icon
  icon: 'application_settings'
})
If you don't specify an icon, the plugin logo will be displayed if any (see Logo).
Tasks parameters
You can add prompts to modify the command arguments. They will be displayed in a 'Parameters' modal.
Example:
api.describeTask({
  // ...

  // Optional parameters (inquirer prompts)
  prompts: [
    {
      name: 'open',
      type: 'confirm',
      default: false,
      description: 'Open browser on server start'
    },
    {
      name: 'mode',
      type: 'list',
      default: 'development',
      choices: [
        {
          name: 'development',
          value: 'development'
        },
        {
          name: 'production',
          value: 'production'
        },
        {
          name: 'test',
          value: 'test'
        }
      ],
      description: 'Specify env mode'
    }
  ]
})
See Prompts for more info.
Task hooks
Several hooks are available:
onBeforeRunonRunonExit
For example, you can use the answers to the prompts (see above) to add new arguments to the command:
api.describeTask({
  // ...

  // Hooks
  // Modify arguments here
  onBeforeRun: async ({ answers, args }) => {
    // Args
    if (answers.open) args.push('--open')
    if (answers.mode) args.push('--mode', answers.mode)
    args.push('--dashboard')
  },
  // Immediately after running the task
  onRun: async ({ args, child, cwd }) => {
    // child: node child process
    // cwd: process working directory
  },
  onExit: async ({ args, child, cwd, code, signal }) => {
    // code: exit code
    // signal: kill signal used if any
  }
})
Task views
You can display custom views in the task details pane using the ClientAddon API:
api.describeTask({
  // ...

  // Additional views (for example the webpack dashboard)
  // By default, there is the 'output' view which displays the terminal output
  views: [
    {
      // Unique ID
      id: 'vue-webpack-dashboard-client-addon',
      // Button label
      label: 'Dashboard',
      // Button icon
      icon: 'dashboard',
      // Dynamic component to load (see 'Client addon' section below)
      component: 'vue-webpack-dashboard'
    }
  ],
  // Default selected view when displaying the task details (by default it's the output)
  defaultView: 'vue-webpack-dashboard-client-addon'
})
See Client addon for more info.
Add new tasks
You can also add entirely new tasks which aren't in the package.json scripts with api.addTask instead of api.describeTask. Those tasks will only appear in the cli UI.
You need to provide a command option instead of match.
Example:
api.addTask({
  // Required
  name: 'inspect',
  command: 'vue-cli-service inspect',
  // Optional
  // The rest is like `describeTask` without the `match` option
  description: '...',
  link: 'https://github.com/vuejs/vue-cli/...',
  prompts: [ /* ... */ ],
  onBeforeRun: () => {},
  onRun: () => {},
  onExit: () => {},
  views: [ /* ... */ ],
  defaultView: '...'
})
⚠️ The command will run a node context. This means you can call node bin commands like you would normally do in the package.json scripts.
Prompts
The prompt objects must be valid inquirer objects.
However, you can add the following additional fields (which are optional and only used by the UI):
{
  /* ... */
  // Used to group the prompts into sections
  group: 'Strongly recommended',
  // Additional description
  description: 'Enforce attribute naming style in template (`my-prop` or `myProp`)',
  // "More info" link
  link: 'https://github.com/vuejs/eslint-plugin-vue/blob/master/docs/rules/attribute-hyphenation.md',
}
Supported inquirer types: checkbox, confirm, input, password, list, rawlist, editor.
In addition to those, the UI supports special types that only works with it:
color: displays a color picker.
Switch example
{
  name: 'open',
  type: 'confirm',
  default: false,
  description: 'Open the app in the browser'
}
Select example
{
  name: 'mode',
  type: 'list',
  default: 'development',
  choices: [
    {
      name: 'Development mode',
      value: 'development'
    },
    {
      name: 'Production mode',
      value: 'production'
    },
    {
      name: 'Test mode',
      value: 'test'
    }
  ],
  description: 'Build mode',
  link: 'https://link-to-docs'
}
Input example
{
  name: 'host',
  type: 'input',
  default: '0.0.0.0',
  description: 'Host for the development server'
}
Checkbox example
Displays multiple switches.
{
  name: 'lintOn',
  message: 'Pick additional lint features:',
  when: answers => answers.features.includes('linter'),
  type: 'checkbox',
  choices: [
    {
      name: 'Lint on save',
      value: 'save',
      checked: true
    },
    {
      name: 'Lint and fix on commit' + (hasGit() ? '' : chalk.red(' (requires Git)')),
      value: 'commit'
    }
  ]
}
Color picker example
{
  name: 'themeColor',
  type: 'color',
  message: 'Theme color',
  description: 'This is used to change the system UI color around the app',
  default: '#4DBA87'
}
Prompts for invocation
In your vue-cli plugin, you may already have a prompts.js file which asks the user a few questions when installing the plugin (with the CLI or the UI). You can add the additional UI-only fields (see above) to those prompt objects as well so they will provide more information if the user is using the UI.
⚠️ Currently, the inquirer types which aren't supported (see above) will not work properly in the UI.
Client addon
A Client addon is a JS bundle which is dynamically loaded into the cli-ui. It is useful to load custom components and routes.
Create a client addon
The recommended way to create a Client addon is by creating a new project using vue cli. You can either do this in a subfolder of your plugin or in a different npm package.
Install @vue/cli-ui as a dev dependency.
Then add a vue.config.js file with the following content:
const { clientAddonConfig } = require