Tutorial: Agentic coding in VS Code
In this tutorial, you build a personal portfolio page with AI agents in Visual Studio Code. You describe what you want in natural language, and an agent creates and edits files. You then review and test the result. The app uses HTML, CSS, and JavaScript, so you don't need to install any runtimes or build tools.
You start in the Agents window to create the app, then continue the same session in the Chat view to refine it alongside your code. Along the way, you learn to open a project folder, preview your app in the integrated browser, and review and commit changes with Git.
Get familiar with the VS Code user interface, editing features, and key productivity tools.
Prerequisites
-
If you use GitHub Copilot, learn more about AI credits and model costs and what happens when you reach a limit.
1. Create a project folder
Agents work in the context of a folder, also referred to as a workspace in VS Code. You start by creating a folder for your project. Start by creating an empty folder for the tutorial app and enabling Git version control to track your changes.
-
On your computer, create a new folder named
myportfolio.mkdir myportfolio -
Put the folder under Git version control to track changes. Open a terminal and run the following commands:
cd myportfolio
git init
2. Build features with the Agents window
The Agents window is a dedicated window in VS Code that is optimized for working with agents across all your projects without needing to open a separate VS Code window for each one.
In this part, you open your folder in the Agents window and task an agent to build your portfolio page.
Open the Agents window
-
In VS Code, select the Open in Agents button in the VS Code title bar.
You can also open the Agents window from the VS Code welcome page, or run the Chat: Open Agents window command from the Command Palette (⇧⌘P (Windows, Linux Ctrl+Shift+P)).

-
If you're prompted to sign in, use the GitHub account that has access to GitHub Copilot. This tutorial uses the Copilot agent harness. To use your own provider credentials for supported workflows, review the agent harness authentication options.
Start an agent session
-
Select New at the top of the left sidebar to start a new agent session.
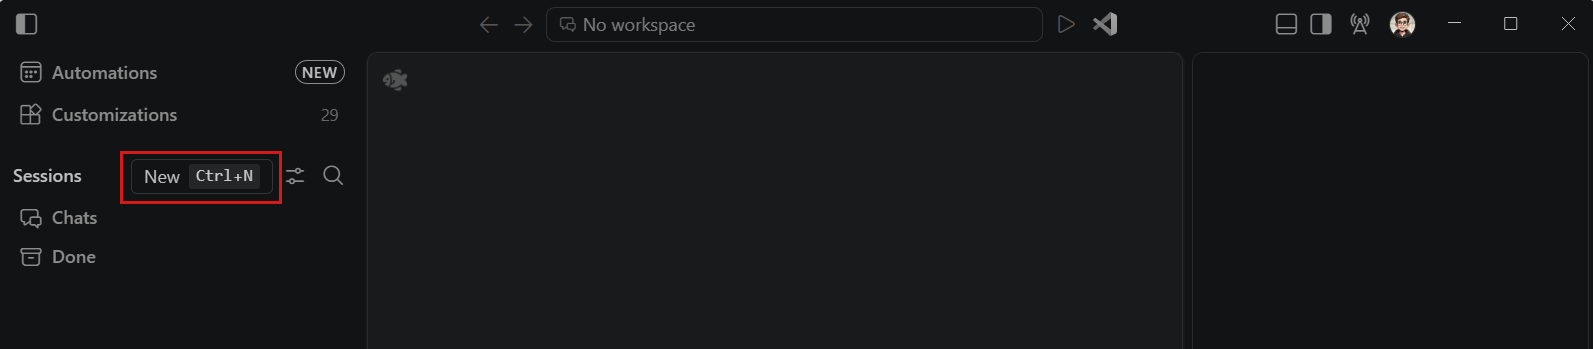
The sidebar shows your list of active agent sessions, grouped by workspace. You can use the sessions list to switch between sessions and their workspace context.
TipIf you want to ask a general question, you can also start a chat session that is not tied to a specific workspace.
-
Because the Agents window can operate across different projects, select the
myportfoliofolder you created earlier from the dropdown. This folder becomes the primary execution workspace for the session.If VS Code asks whether you trust the folder, select Trust.
ImportantWhen you download code from the internet, review the code before trusting it to make sure it's safe to run. Get more info about Workspace Trust.
-
Configure the following settings for the session. Keep the default values for any other options.
Control Value Short description Session Target Copilot Uses the Copilot agent harness to run the session on your machine. Agent Agent Uses tools to plan, edit files, run commands, and validate the result. Language model Auto Automatically selects a model based on task complexity and availability. Permissions Manual permissions Requests your approval for running tools or accessing resources. The agent can make file edits in your project folder. 
-
Enter the following prompt in the chat input and press Enter:
Create a personal portfolio page with HTML, CSS, and JavaScript in separate files. Include a header with my name and a short bio, a section for projects with cards, and a contact section. Use modern styling and add some sample content. -
The agent analyzes your request, plans the work, and then starts creating and editing files. If it encounters errors, it self-corrects or asks for clarification and approval.

The Copilot agent harness applies and saves edits directly to your project folder. Review the resulting diffs before you commit the changes.
TipIf the agent heads in the wrong direction, steer or stop the request. Stopping doesn't undo completed actions. To undo workspace file changes from a request, restore a checkpoint.
Preview and iterate on the design
The Agents window is great for workflows where you hand off tasks to the agent and then validate the outcome, rather than the specific code changes. With the integrated browser, you can preview the agent's work without having to leave VS Code.
To preview the generated portfolio in the integrated browser:
-
Select the Files tab in the left sidebar, right-click the
index.htmlfile and select Open in Integrated Browser.The Files tab shows all files in the workspace, similar to the Explorer view in the editor.

-
The integrated browser opens in a new tab in the Agents window, and you can interact with the page as you would in a normal browser.

-
Let's make a design change to the page. In the integrated browser, select the Add Element to Chat button to enter selection mode.

-
Hover over the page and select an element you want to change, for example select the main title.
The agent adds the selected element to your prompt as context, including its HTML, CSS, and a screenshot.
-
In the chat input, enter a prompt that describes the change you want, and press Enter. For example:
Use a gradient color for the text and use cursive. -
The agent applies the change to the element you selected. Refresh the page in the integrated browser to see the updates.
Review and commit the changes
Before you commit the agent's work, review the code changes that the agent applied. The Changes panel shows diffs for every file the agent created or modified during its session. To review and commit the file changes:
-
Select the Changes panel to see the diffs of the files the agent added or modified. Each item also shows change stats and an add/delete/update indicator.

For keyboard and screen reader access to the diffs, use the Accessible Diff Viewer.
-
Open the diff from the
index.htmlfile and select a block of text to open the inline feedback flow. Enter your feedback and then select Submit.
Notice that your feedback is added to the chat conversation, and the agent processes it and applies the change to the file. You can continue to provide feedback on other changes in the diff view.
-
From the changes dropdown, select Uncommitted Changes to see the changes that have not yet been committed to your Git repository.
Use the changes dropdown to switch between branch changes, uncommitted changes, all changes from the session, and changes made during the last agent turn.

-
Now select Commit Changes in the Changes panel to save the agent's changes to your Git repository.
VS Code automatically creates a commit message based on the agent's prompt and the changes it made.
After committing the changes, the branch changes and uncommitted changes are now empty because there are no pending changes. The change stats are also cleared from the session entry in the session list.
3. Continue working with agents in the editor
For some changes, you might prefer a code-first approach, where your focus is on writing code and Copilot assists you in the process. For example, you might want to add a theme switcher and fine-tune the styles as you go. For this approach, continue the same Copilot harness session in the Chat view.
Open the editor for your workspace
-
In the Agents window, select the Open in Editor button in the title bar to open the active workspace in the editor.

This opens a new VS Code window with your workspace. The Chat view is still open in the right sidebar, so you can interact with agents while you work in the editor.
-
Notice that the left sidebar shows the Explorer view, which displays the files in your workspace. Select a file to open it in an editor tab in the main area.

The Chat view in the right sidebar shows the ongoing agent session you created previously in the Agents window.
Continue the session from the Chat view
The Chat view is located in the Secondary Side Bar, alongside your editor tabs. The same Copilot harness session remains active when you move between the Agents window and the editor.
-
Enter the following prompt in the chat input and press Enter:
Add an accessible theme switcher button that toggles between light and dark color themes. Persist the selected theme across page reloads, update the button label to describe the theme it applies, and keep the layout responsive on narrow screens.Copilot applies and saves the changes directly to your project files.
-
Open the Source Control view to review the files that Copilot changed. Select a file to inspect its diff.
You can also select a changed file in the Chat view to open its diff.
-
Select the
index.htmlfile and select the Open in Integrated Browser (globe) button in the title bar. -
In the integrated browser, validate the changes:
- Select the theme switcher and verify that the page colors and button label change.
- Resize the browser to a narrow width and verify that the content remains readable and the project cards adapt to the available space.
- Use Tab to focus the theme switcher, and then use Enter or Space to toggle the theme.
-
If a check fails, describe what you observed to Copilot in the Chat view. For example:
The selected theme resets after I refresh the page. Persist the theme selection and verify that it is restored when the page loads. -
Review the final changes in the Source Control view and commit them to your Git repository.
Congratulations! You built a portfolio page with Copilot by using both an agent-first and code-first approach. You continued the same session across the Agents window and the Chat view, and used the integrated browser to preview and validate the result.
Next steps
To go deeper with agentic coding in Visual Studio Code, get more info about how to: